Channels
Updated till version 2.0
Channels
VNCchannels is a collaborative space where you can store data, structure information by topics, and generate knowledge. With the right people and information in one place, teams can share ideas, come to conclusions, reach decisions, and move forward with a common purpose.
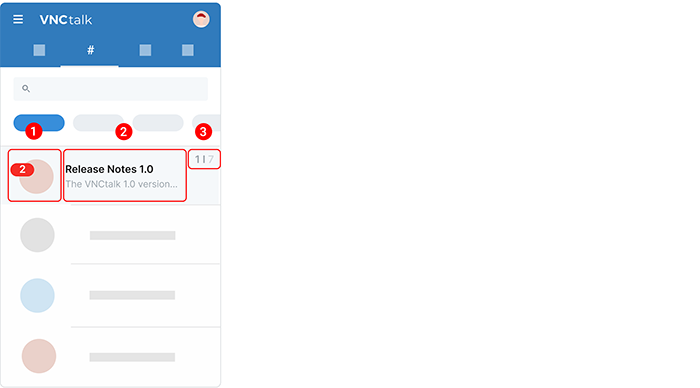
Each channel has the following components:
- The figure displays the number of unread topics in the channel. The picture is the channel avatar.
- The channel name and description.
- The left figure displays the number of unread topics and the right figure displays the total number of topics in the channel.
Public, private, intranet, extranet, and iOM channels
You cannot convert a public channel into a private, extranet, or intranet channel and vice versa.
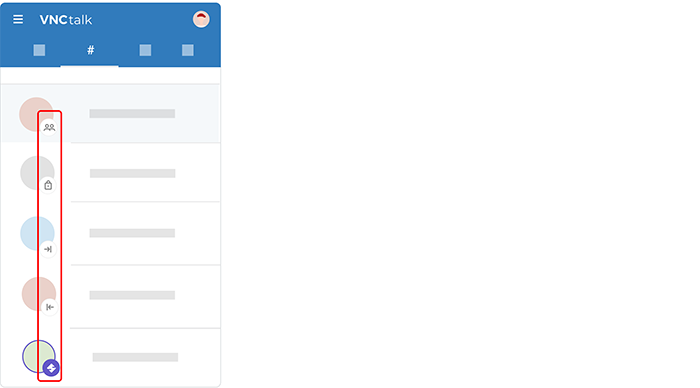
There are 5 types of channels: Public, Private, Extranet, Intranet, and iOM.
- Public channel is viewable to everyone in your team/ organization. Team members can see the channel when they browse channels, and they can join the channel if they feel that the topic is relevant to them. Public channels are those with the following icon
 on the avatar.
 - Private channel is visible to invited team/ organization members. It will not appear in the list of a team’s browsable channels. Private channels are those with a lock icon
 on the avatar.
 - Extranet channel is for collaborating with users of the same domain and connected IOM instances. Extranet channels are those with the following icon
 on the avatar.
 - Intranet channel is for collaborating with domain users. Only people who are moderators or members of an intranet channel can access it, so you must be invited to join one. Intranet channels are those with the following icon
 on the avatar.
 - IOM channel is used to collaborate with users of the same and connected IOM instances, providing access to shared data. IOM channels are those with the following icon
 on the avatar.
Filter channels
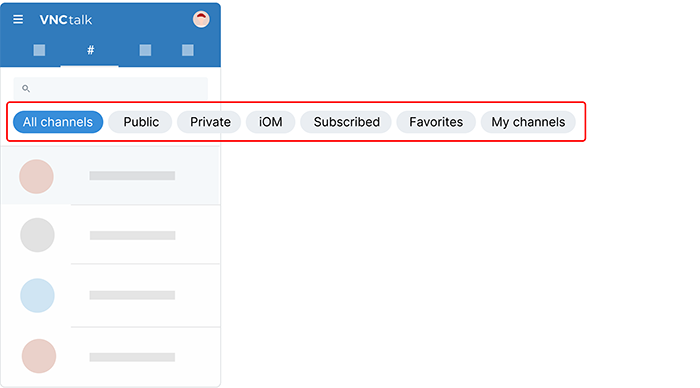
VNCchannels has the following chips to filter channels:
- All channels. This is the place where you can find all the channels: public, private, favorite, and channels you create and are subscribed to.
- Public. The chip is used to filter all the channels that are available for public viewing.
- Private. The chip is used to filter all the channels that are available only for a specific audience.
- iOM. The chip is used to filter all the iOM channels you subscribe to.
- Subscribed. The chip is used to filter all the channels you are subscribed to.
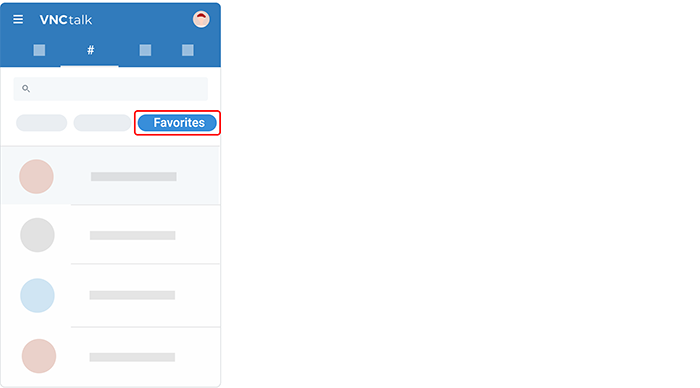
- Favorites. The chip is used to filter all the channels you mark as "favorite".
- My channels. The chip is used to filter all the channels you create.
Grant access to a private channel
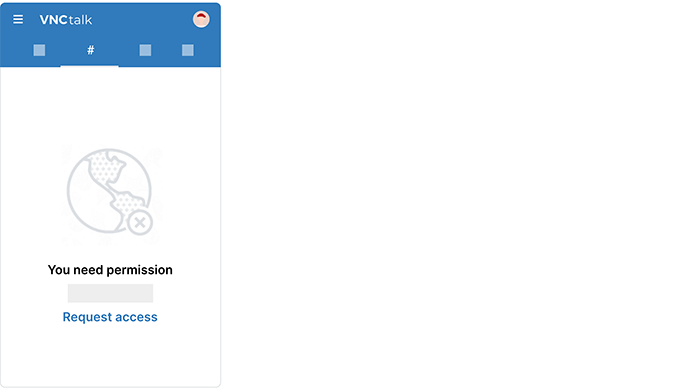
Channel admins will have to approve participation requests before someone can join the channel. If a user is not a participant in the private channel, they will not be able to access that private channel. Clicking the private channel’s URL will result in a “Request access” screen:
- If a user is granted a private topic’s access in a private channel to which the user does not already have access, the user will get access to both: the private channel and the private topic.
- All public and private topics along with the private channel should be hidden from the user if revoked private channel’s access by the admin or unsubscribed from the private channel from the user’s end.
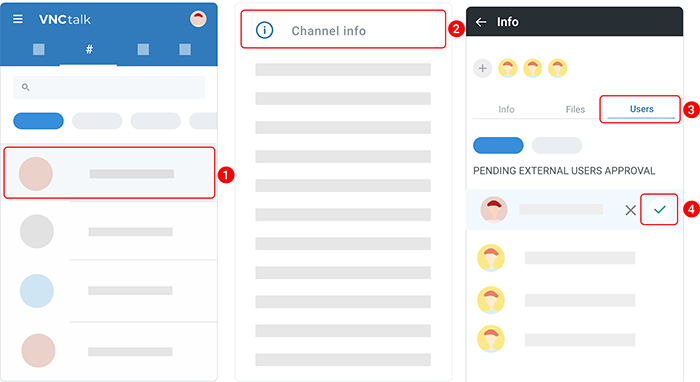
To grant access to a private channel, do the following:
- Tap and hold a channel to open an options menu.
- Select Channel Info.
- Tap the Users tab.
- Under the PENDING EXTERNAL USERS APPROVAL section, you can see a list of access requests. Click the checkmark icon next to the user you want to add to the channel.
- The private channel in the channel listing will appear immediately when the request is approved. The user will be notified via notifications about the granted access.
Once a channel admin has granted someone access, they can access that channel’s resources, add comments, and create a new topic.
Create a channel
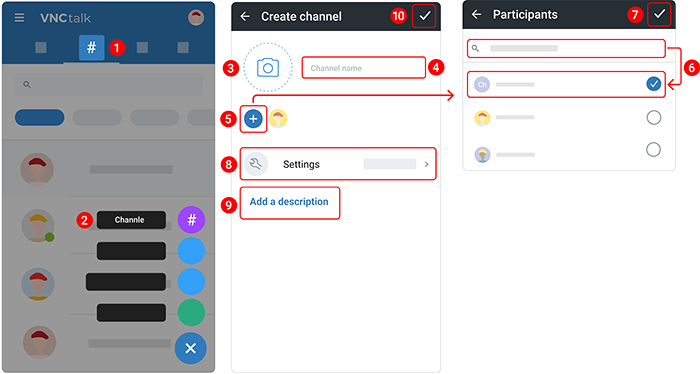
- Open Channels.
- Tap the plus icon
 at the bottom and select Channel.
 - Give the channel a name.
- Tap the plus icon
 to add participants to your channel.
 - (Optional) Tap the camera icon to add a channel image. Tap Upload and select an image from your device, crop it, and then tap Save.
- (Optional) Under Settings you can add tags. Once done, tap the checkmark in the upper right corner to save all of the changes.
- Under Type, choose a channel type.
- (Optional) Tap Add description and enter an optional description.
- Tap the checkmark icon in the upper right corner.
You should see the notification stating Channel created.
Access channel information
There are 2 ways to access channel information.
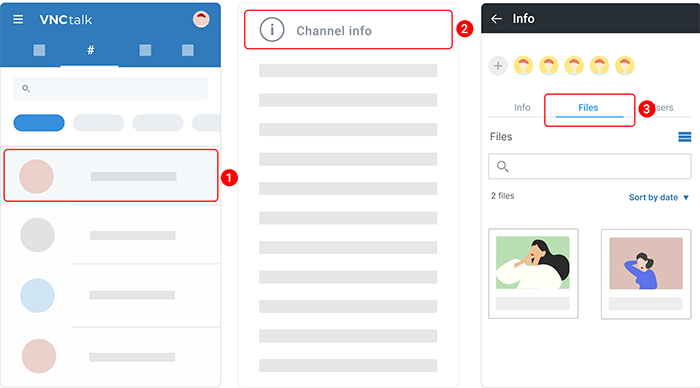
Way 1. From the list of channels.
- Tap and hold a channel to reveal an additional menu.
- Select Channel Info.
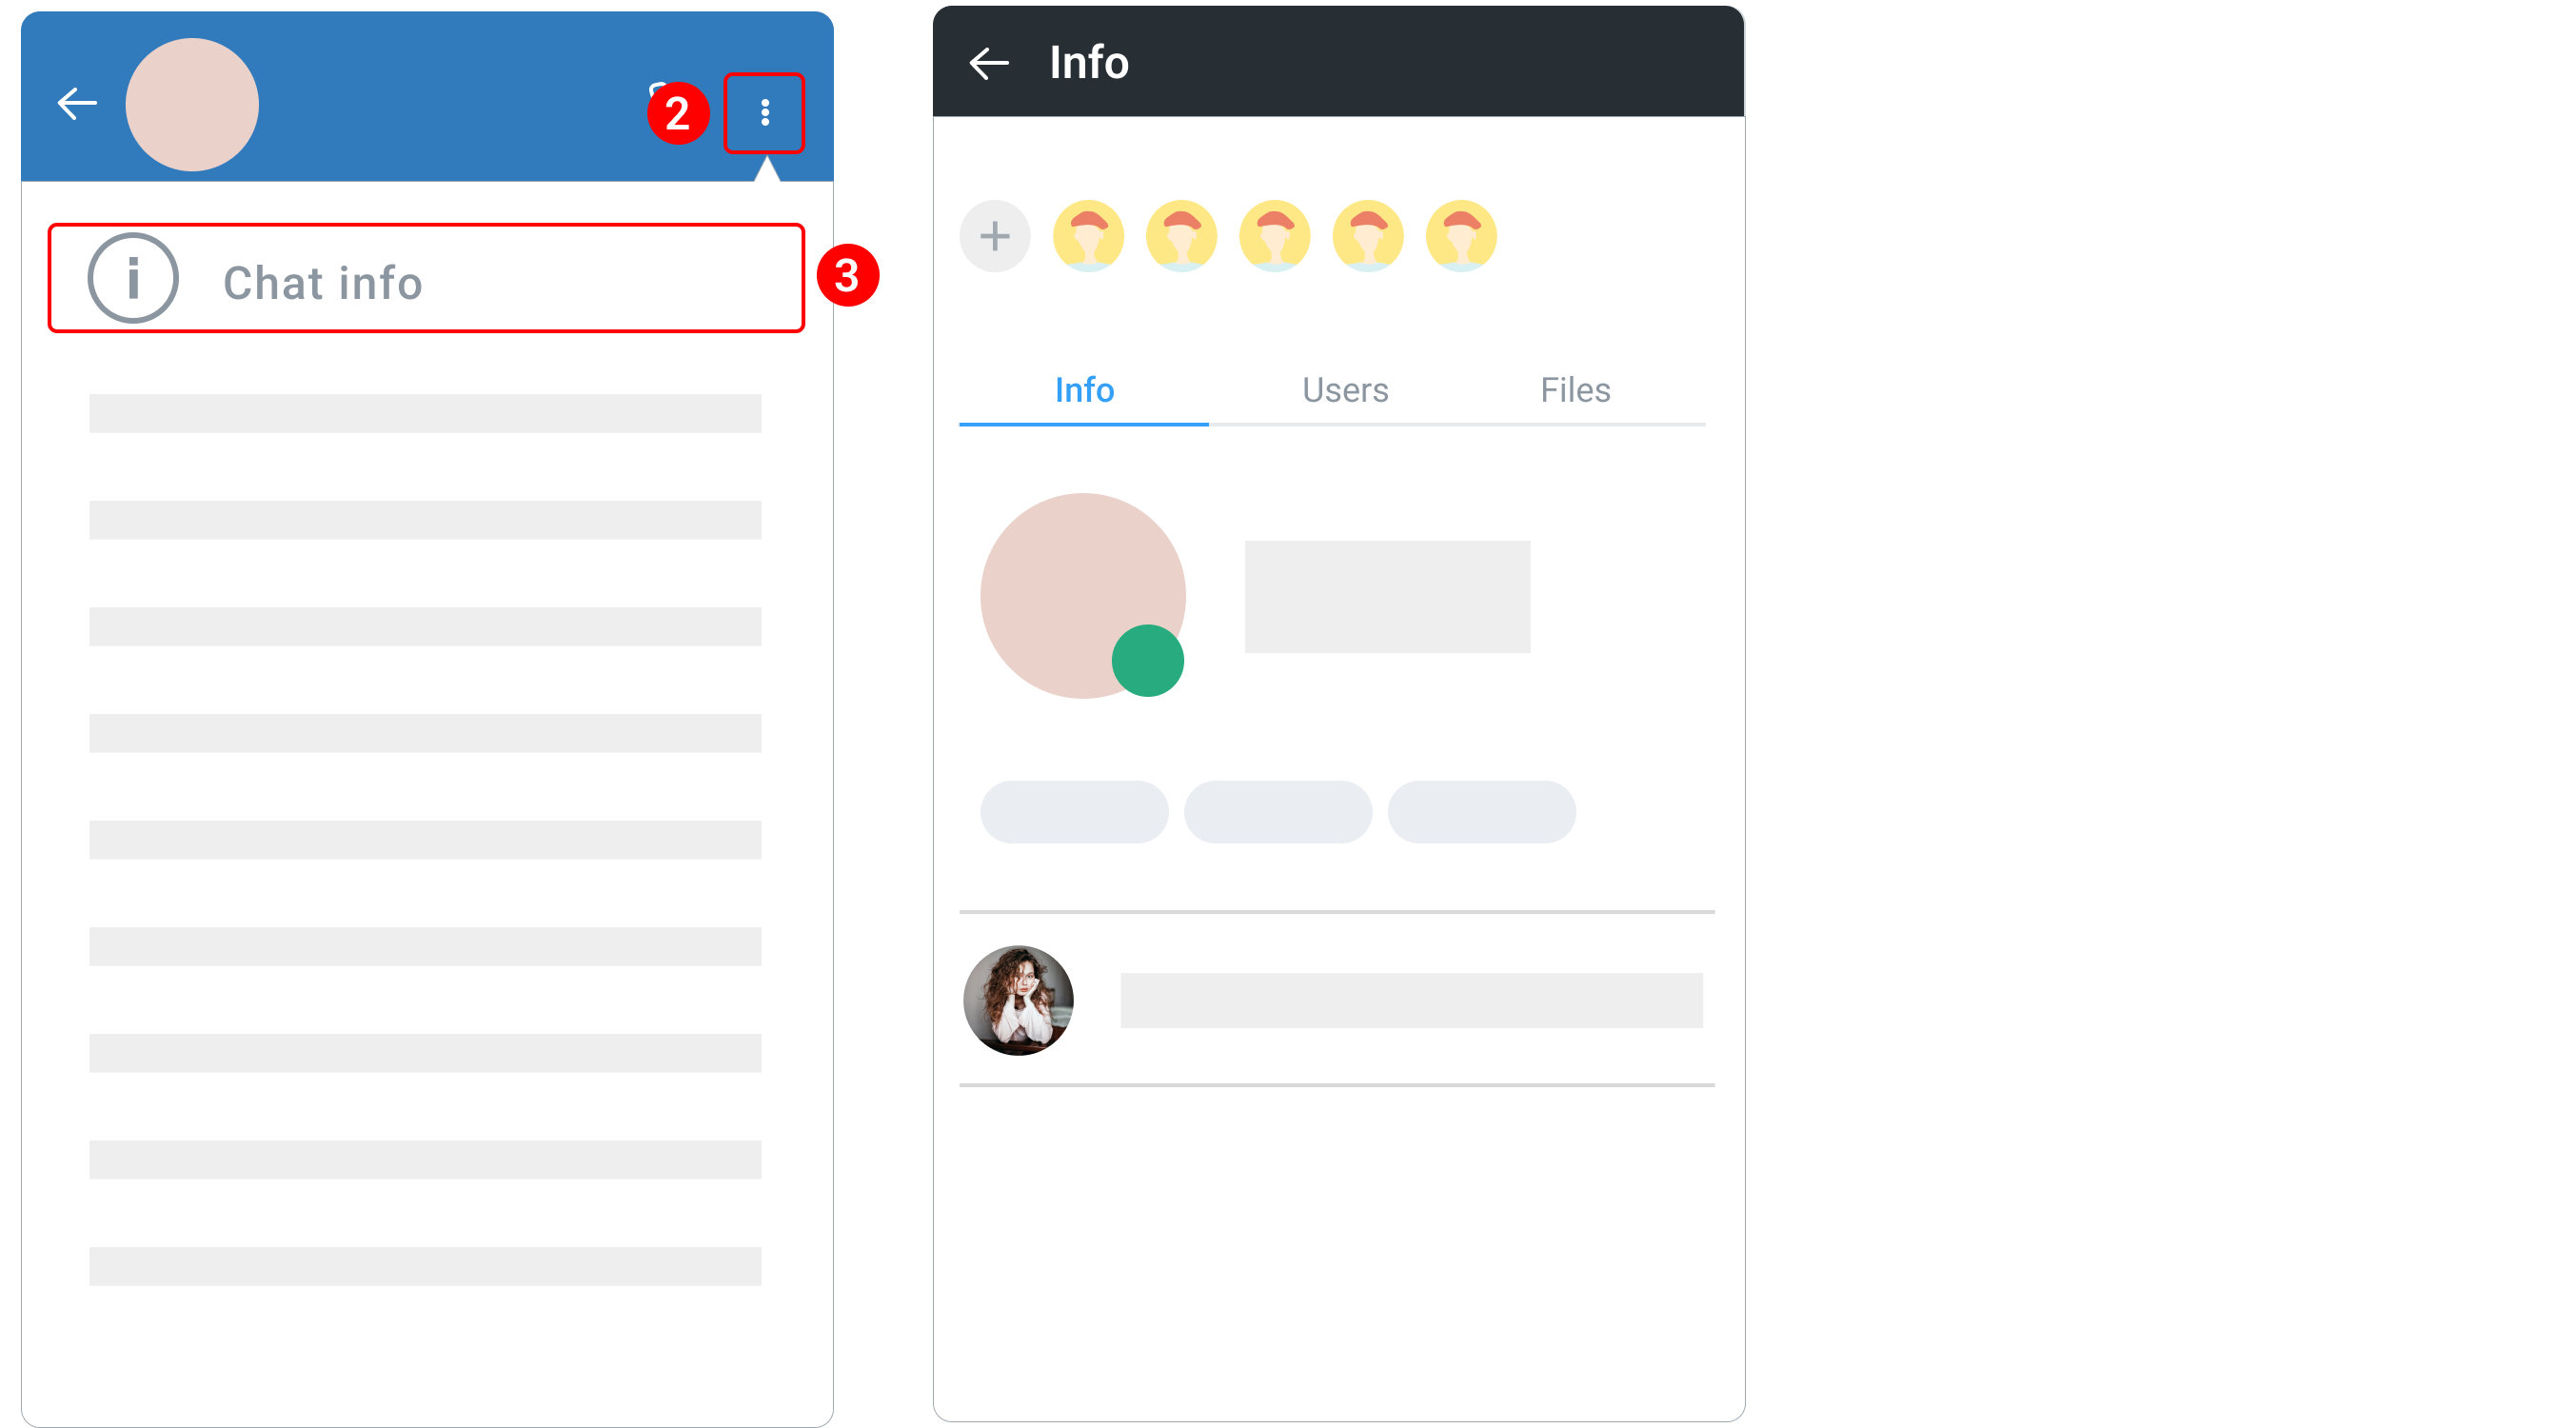
Way 2. From the channel home page.
Info screen options available in channels:
- Add a user to the channel
- Update the channel image
The information available in channels:
- Info. See and edit the channel name, description, and tags. You can also update the channel image.
- Files. A collection of all the images, videos, and docs.
- Users. See who’s in a channel. A tap on the kebab icon
 in the participant list allows viewing participant profile information, changing the role, or removing the user from the channel.
Add a user to a channel
Only Channel Moderator can add users to channels.
There are 2 ways to add a user to a channel.
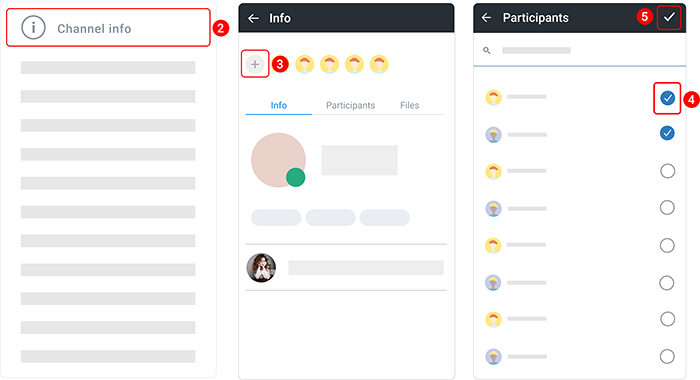
Way 1. From the list of channels.
- Tap and hold a channel to open an options menu.
- Select Channel Info.
- Tap the plus icon
 .
. - Select or search for a required user(s) and tap them.
- In the upper right corner, tap the checkmark.
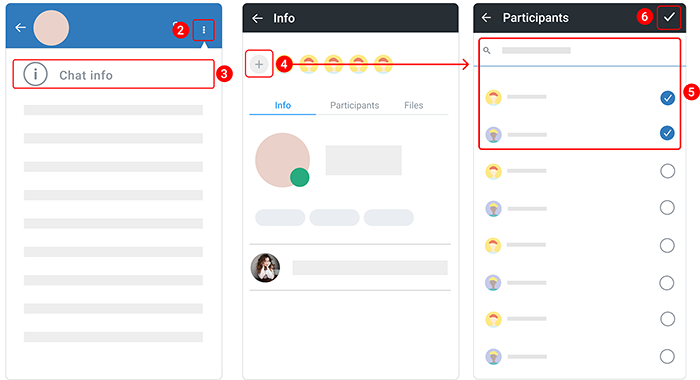
Way 2. From the channel home page.
- Open a channel.
- In the upper right corner, tap the kebab menu icon
 .
. - Select Channel Info.
- The following steps are the same as for the first way of adding a user to a channel.
Remove a user from a channel
Only Channel Moderator can add users to channels.
There are 2 ways to remove a user from a channel.
Way 1. From the list of channels.
- Tap and hold a channel to open an options menu.
- Select Channel Info.
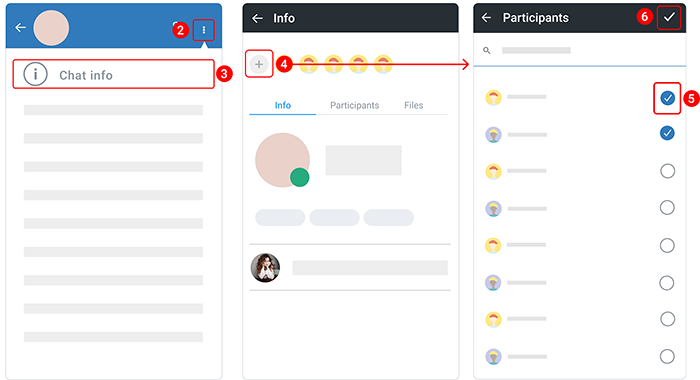
- Tap the plus icon
 .
. - Remove the tick next to a required user.
- In the upper right corner, tap the checkmark.
Way 2. From the channel home page.
- Open a channel.
- In the upper right corner, tap the kebab menu icon
 .
. - Select Channel Info.
- The following steps are the same as for the first way of removing a user from a channel.
Change a user's role
Each member of a channel has a specific role. Based on these roles, permissions can be enabled for users.
There are 3 roles that users can be categorized into Author, Moderator, and Regular User.
- Author. Author is the creator of the channel and can perform all actions in a channel.
- Moderator. Moderator is next to the authors and the role of a moderator is assigned to users by the author.
- Regular users. All the other users in the channel are considered regular users.
Authors can assign a role to any member and even change it later on.
To change a user's role:
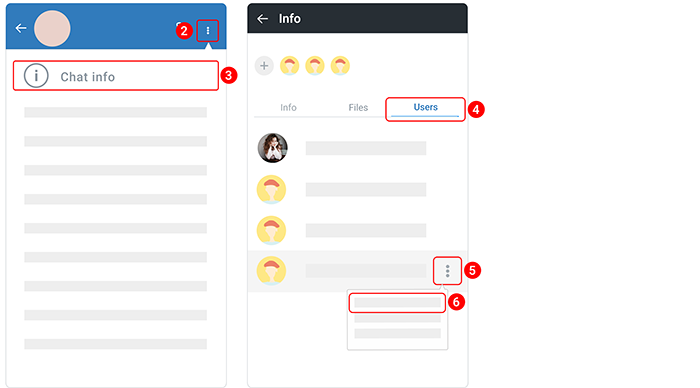
- Open a channel.
- In the upper right corner, tap the kebab menu icon
 .
. - Select Channel Info.
- Tap the Users tab. Here, you can toggle between viewing All or Active users in your channel.
- Tap a user and then the kebab menu icon
 to reveal additional actions.
 -
Select one of the following options:
- Make a moderator if a user has a regular user role.
- Make a regular user if a user is a moderator.
-
When prompted, tap CONFIRM to confirm that you want to change a user's role.
Pin a channel
Some channels deserve to be prioritized and viewed at a glance.
The pin channel feature allows you to pin specific channels to the top of your channels list so you can quickly find them. You can select up to 5 channels to pin at once.
There are 2 ways to pin a channel.
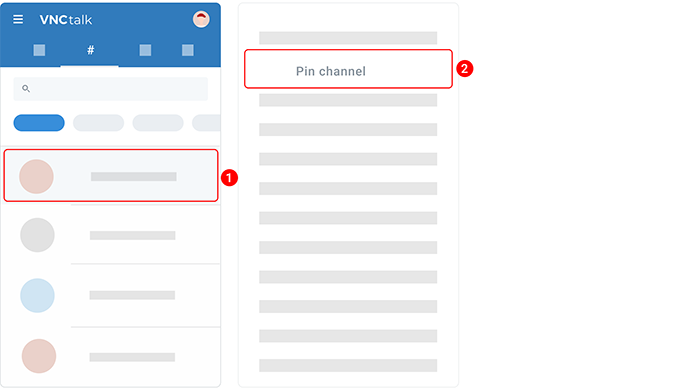
Way 1. From the list of channels.
- Tap and hold a channel to open an options menu.
- Select Pin channel.
- To unpin a channel, tap and hold a channel to open an options menu. Select Unpin channel.
You should see the pin icon ![]() next to the channel.
next to the channel.
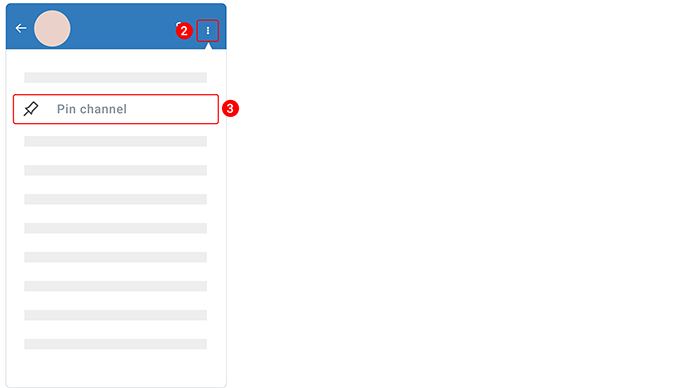
Way 2. From the channel home page.
- Open a channel.
- In the upper right corner, tap the kebab menu icon
 .
. - Select Pin channel.
- To unpin a channel, tap the kebab menu icon
 again and then Unpin channel.
Add a channel to the "Favorite" list
You can mark channels as favorites to make them easy to find.
There are 2 ways to add a channel to favorites.
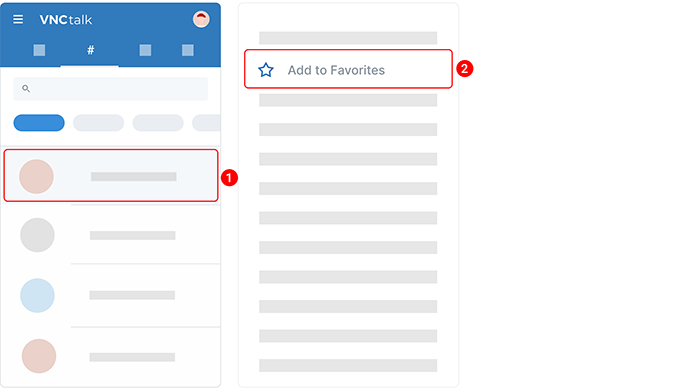
Way 1. From the list of channels.
- Tap and hold a channel to open an options menu.
- Select Add to Favorites.
- To remove a channel from the "Favorites" list, tap and hold a channel to open an options menu. Select Remove from Favorites.
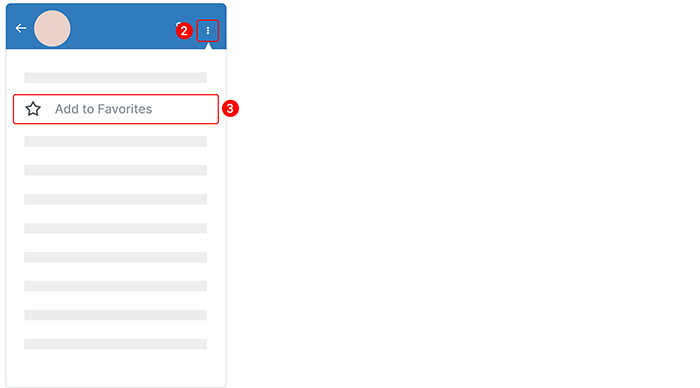
Way 2. From the channel home page.
- Open a channel.
- In the upper right corner, tap the kebab menu icon
 .
. - Select Add to Favorites.
- To remove a channel from the "Favorites" list, tap the kebab menu icon
 again and then Remove from Favorites.
You can view your favorite channels by tapping the Favorite chip, where you will see a list of channels you've marked as a favorite.
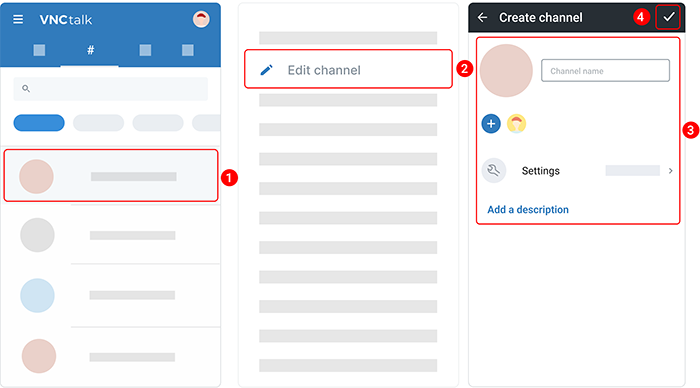
Edit a channel
Only Channels Moderator can edit channels information.
There are 2 ways to edit a channel.
Way 1. From the list of channels.
- Tap and hold a channel to open an options menu.
- Select Edit Channel.
- Update the channel information.
- In the upper right corner, tap the checkmark.
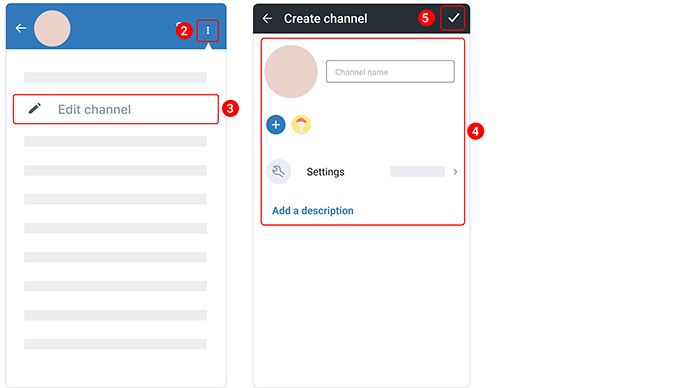
Way 2. From the channel home page.
- Open a channel.
- In the upper right corner, tap the kebab menu icon
 .
. - Select Edit Channel.
- The following steps are the same as for the first way of editing a channel.
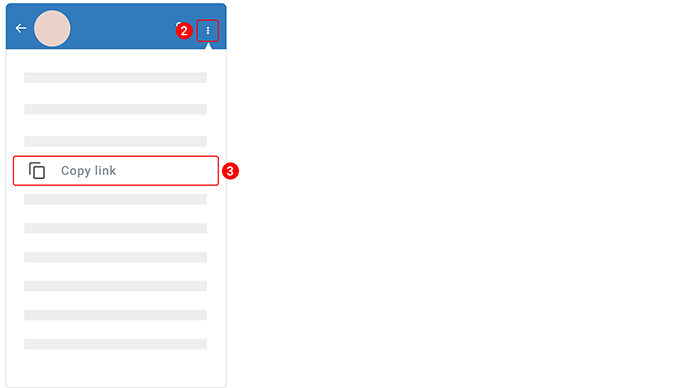
Copy a channel link
There are 2 ways to edit a channel.
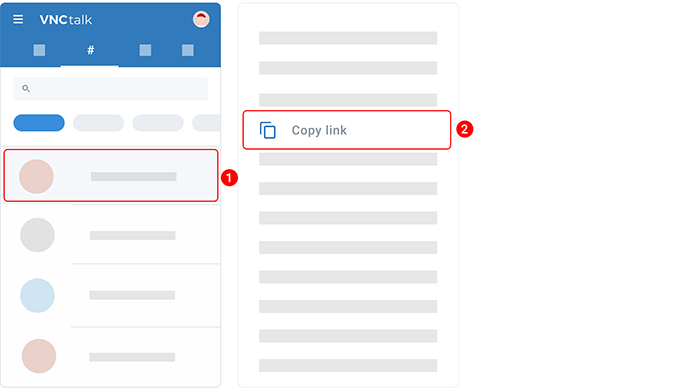
Way 1. From the list of channels.
- Tap and hold a channel to open an options menu.
- Select Copy link.
Way 2. From the channel home page.
Subscribe to a channel
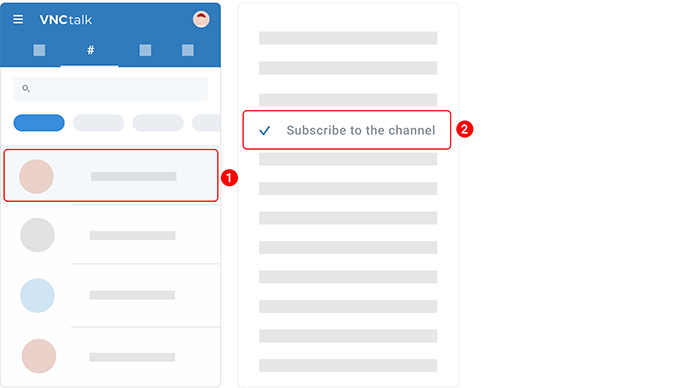
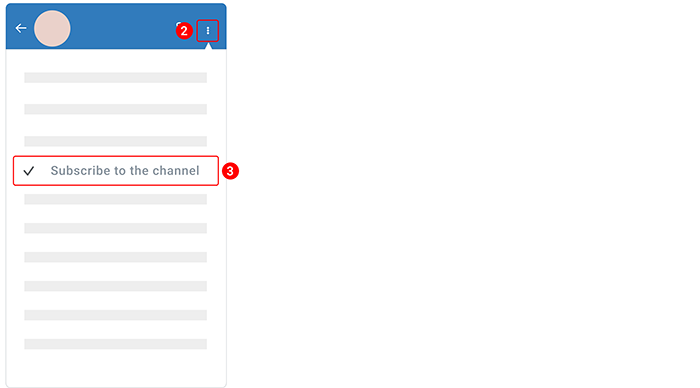
There are 2 ways to subscribe to a channel.
Way 1. From the list of channels.
- Tap and hold a channel to open an options menu.
- Select Subscribe to the channel.
- To unsubscribe from the channel, tap and hold a channel to open an options menu. Select Unsubscribe from the channel.
Way 2. From the channel home page.
- Open a channel.
- In the upper right corner, tap the kebab menu icon
 .
. - Select Subscribe to the channel.
- To unsubscribe from the channel, click the kebab menu icon
 again and then Unsubscribe from the channel.
Mute a channel
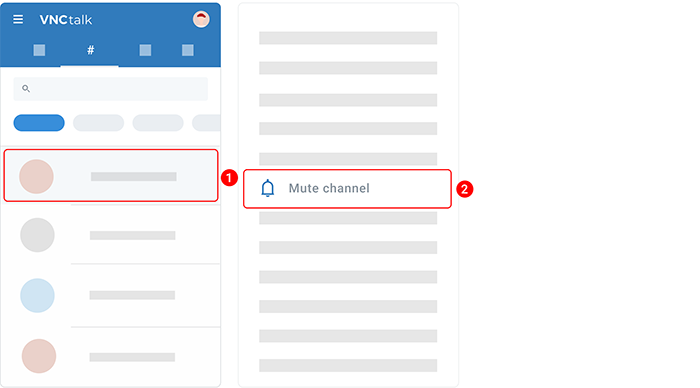
There are 2 ways to mute a channel.
Way 1. From the list of channels.
- Tap and hold a channel to open an options menu.
- Select Mute channel.
- To unmute the channel, tap and hold a channel to open an options menu. Select Unmute channel.
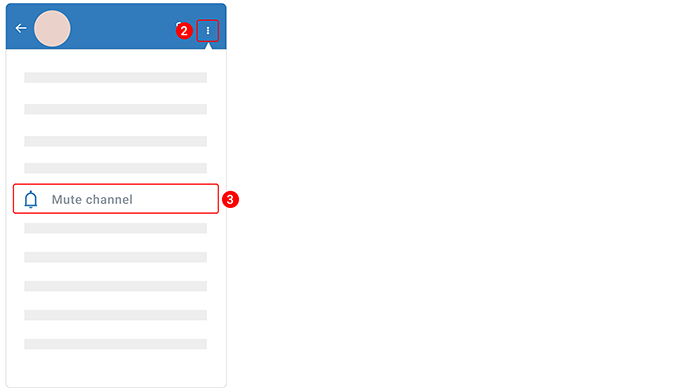
Way 2. From the channel home page.
- Open a channel.
- In the upper right corner, tap the kebab menu icon
 .
. - Select Mute channel.
- To unmute the channel, click the kebab menu icon
 again and then Unmute channel.
Send a channel link
There are 2 ways to send a channel link.
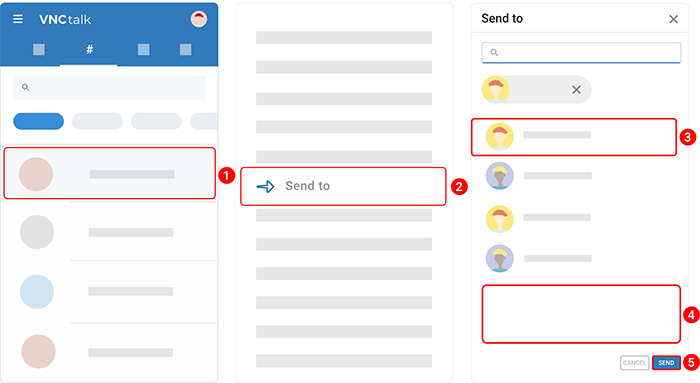
Way 1. From the list of channels.
- Tap and hold a channel to open an options menu.
- Select Send to.
- In the Send to box that pops up, enter the name of the person you want to forward a channel to or choose from the suggested account list.
- You have the option to add a comment to your message.
- Tap Send.
You should see the notification stating Link sent.
Way 2. From the channel home page.
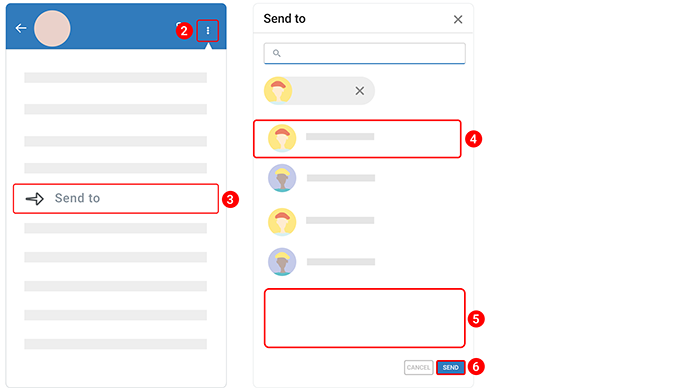
- Open a channel.
- In the upper right corner, tap the kebab menu icon
 .
. - Select Send to.
- The following steps are the same as for the first way of sending a channel link.
Archive a channel
Only Moderators can archive/ unarchive channels at any time. Participants can still visit an archived channel, but won't be able to make any changes in that channel.
Archiving channels allows you better organize and visualize channels. When you archive a channel, it will no longer appear in your Channels list.
- Archiving a channel doesn't delete the channel.
- You will not receive notifications for archived channels unless you're mentioned or replied to.
There are 2 ways to archive a channel.
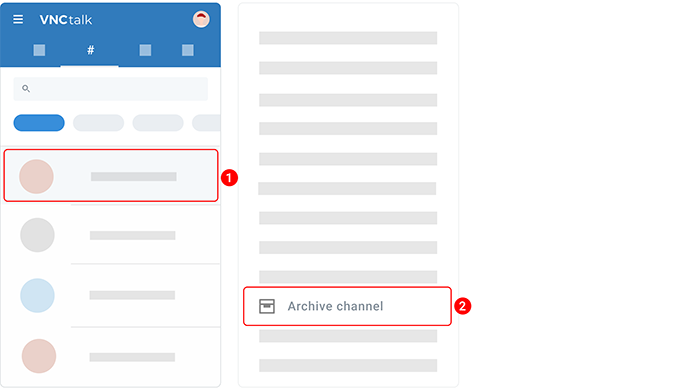
Way 1. From the list of channels.
- Tap and hold a channel to open an options menu.
- Select Archive channel.
- Tap ARCHIVE to confirm that you want to archive the channel.
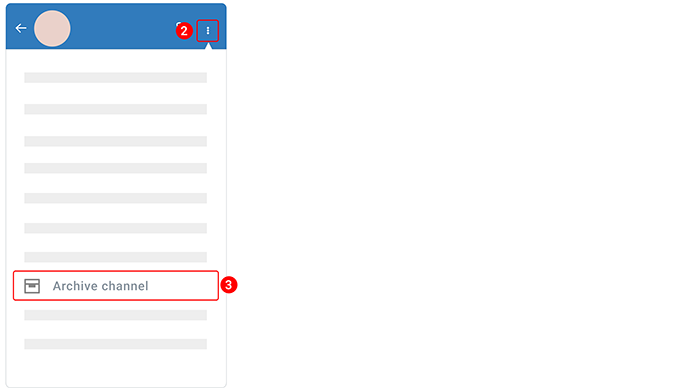
Way 2. From the channel home page.
- Open a channel.
- In the upper right corner, tap the kebab menu icon
 .
. - Select Archive channel.
- Tap ARCHIVE to confirm that you want to archive the channel.
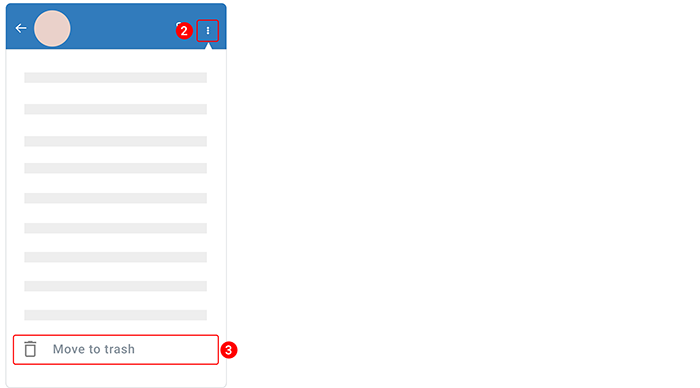
Move a channel to trash
Only Moderators can delete channels.
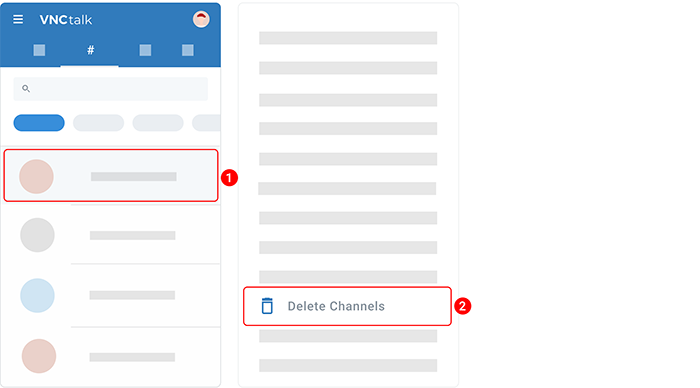
Delete a channel
Only Channels Moderator can delete channels.
- Tap and hold a channel to open an options menu.
- Select Delete channel.
- Tap DELETE to confirm that you want to delete the channel.
You should see the notification stating Channel deleted.
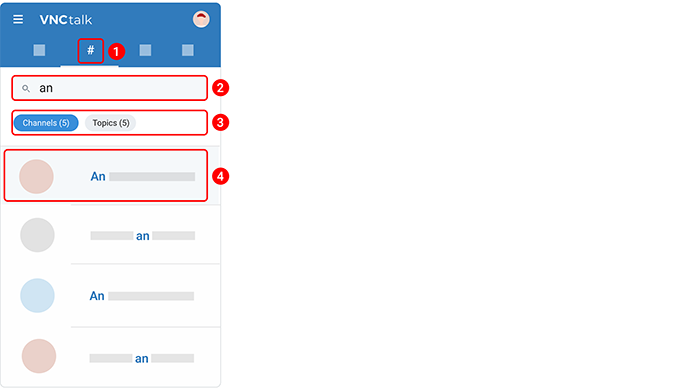
Search for a channel
- Open Channels.
- Type a keyword into the search box above a list of channels.
- When results appear, toggle between Channels and Topics.
- To open a result, tap it.
