Briefcase
Updated till version 3.0
Create a briefcase folder
Briefcase allows you to upload files and save them in your mailbox, and then gain access to these files whenever you sign in to your account from any device.
- You can share your Briefcase folders with others who can view and make any changes to the files.
- You can create multiple Briefcase folders and then upload documents from your computer, save attachments sent with your email messages, and create new files.
- A file in Briefcase is a copy of an original, whether it's on your computer or attached to your email. Any changes you make to a file in your Briefcase will not change the original.
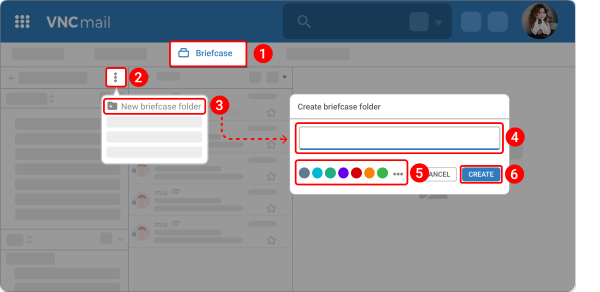
To create a briefcase folder, do the following actions:
- Go to the Briefcase tab.
- Click the kebab menu icon
 next to Briefcase folders.
 - Select New briefcase folder from the dropdown menu.
- Type a name for the folder.
- Choose the desired color from the palette.
- Click the checkmark
 at the bottom.
You can check the created briefcase folder in the "Briefcase folders" list.
Edit a briefcase folder
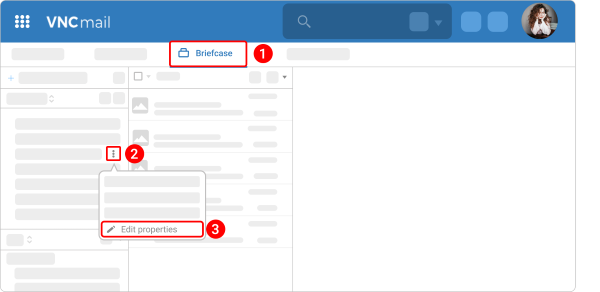
By using the "Edit briefcase folder properties" option, you can rename the briefcase folder and change the color associated with it. You can also change the sharing parameters.
- Go to the Briefcase tab.
- Hover the pointer over a required briefcase folder and click the kebab menu icon
 next to it.
 - Select Edit Properties from the dropdown menu.
- Make your changes.
- If you need to customize the sharing parameters, click ADD SHARE and follow the steps from the "Share a briefcase folder" subsection.
- Click the checkmark
 at the bottom.
Delete a briefcase folder
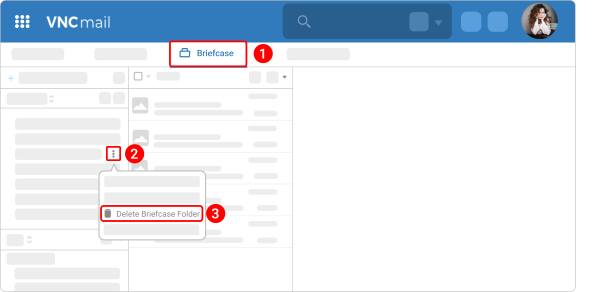
If you don't need a briefcase folder anymore, you can delete it.
- Go to the Briefcase tab.
- Hover the pointer over a required briefcase folder and click the kebab menu icon
 next to it.
 - Select Delete briefcase folder from the dropdown menu.
- Click DELETE to confirm that you want to delete the briefcase folder.
Share a briefcase folder
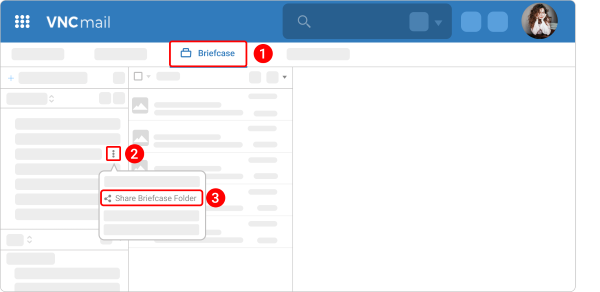
Folder sharing allows you to share an entire folder with your organization members and external users. You can also specify the level of sharing you want to grant to shared folders. For instance, you can give a user read-only permissions and other users edit permissions.
- Go to the Briefcase tab.
- Hover the pointer over the folder you want to share and click the kebab menu icon
 next to it.
 - Select Share briefcase folder from the dropdown menu.
- Under the Share with section, select whether you want to share with external guests or other users of VNCmail.
-
Depending on with whom you share, do the following:
- For Internal users, enter the user’s email addresses. Under the Role section, select the access privileges.
- For External guests, enter the user’s email addresses. External guests are sent an email message with a link to the shared item. They create a display name and password the first time they go to view the shared item.
-
Set the sending parameters:
- Do not send mail about this share. If you do not want the users to get the notification message when you share a briefcase folder with them.
- Send standard message. If you want the users to get the notification message when you share a briefcase folder with them
- Add note to standard message. If you want to add a note to the notification message. If you select this option, you should fill in the appeared Message field.
Delete a briefcase folder permanently
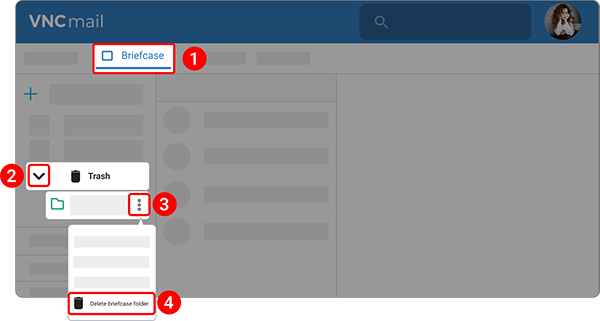
If you don't want a briefcase folder to stay in your trash, you can delete it permanently. When you empty the "Trash" folder, you can't recover them.
- Go to the Briefcase tab.
- Click the down arrow next to the Trash folder.
- Hover the pointer over the folder you want to delete and click the kebab menu icon
 next to it.
 - Select Delete briefcase folder from the dropdown menu.
- Click DELETE to confirm that you want to delete the briefcase folder permanently.
Add a file to a briefcase folder
When you upload a file, it copies from your personal computer to your mail account. This makes the file available any time you log into your account.
- Go to the Briefcase tab.
- Click Upload File.
- Enter a message in the Notes field if you need to add some notes.
- Click BROWSE to find the file to upload.
- Select a required file and then click UPLOAD.
The files are displayed in the briefcase.
Create a document in a briefcase
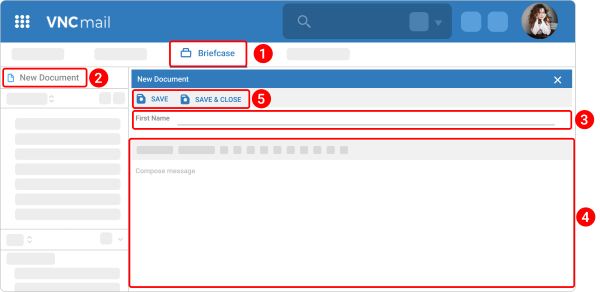
You can create a document in Briefcase using the rich-text format tools.
- Go to the Briefcase tab.
- Click New Document.
- Enter a document name in the File Name field.
- Compose a message.
- Click SAVE.
- Enter the note in the text box and then click OK.
Work with a file in a briefcase
Sort files
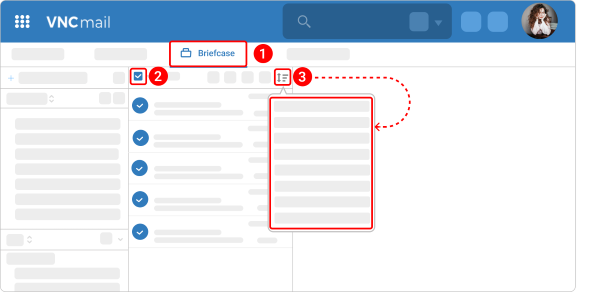
You can sort files by different attributes in ascending (A-Z) or descending (Z-A) order.
- Go to the Briefcase tab.
- In the upper left corner of the file list, check the box to highlight all files in the folder.
-
Click the sort icon
 and select one of the following sorting options:
- Name ascending. Select to sort items in ascending order A-Z.
- Name descending. Select to sort items in descending order Z-A.
- Date ascending. Select to sort items in order that the oldest ones come first and the most recent ones last.
- Date descending. Select to sort items in order that the most recent ones come first and the oldest ones last.
- Size ascending. Select to sort items in order that the smallest ones come first and the largest ones last.
- Size descending. Select to sort in order that the largest ones come first and the smallest ones last.
Rename a file
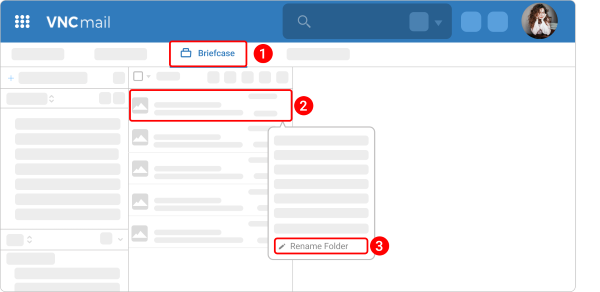
There are 2 ways to rename a file in a briefcase folder.
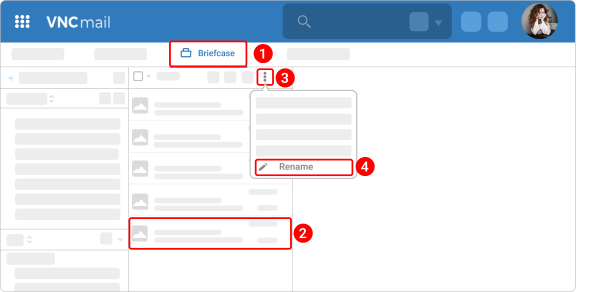
Way 1. Using the kebab menu icon.
- Go to the Briefcase tab.
- Click the file to be renamed.
- In the upper right corner of the file list, click the kebab menu icon
 .
. - Select Rename from the dropdown menu.
- Rename the document.
- Click RENAME.
Way 2. Using the "Rename" option.
- Go to the Briefcase tab.
- Right-click the file to be renamed.
- Select Rename from the dropdown menu.
- The further steps are the same as for the first way of renaming a file in a briefcase folder.
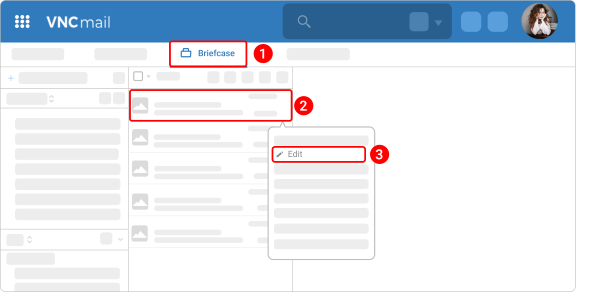
Edit a file
- Go to the Briefcase tab.
- Right-click the file to be edited.
- Select Edit from the dropdown menu.
- Edit the document.
- Click SAVE.
Add a tag to a file
There are 2 ways to add a tag to a file.
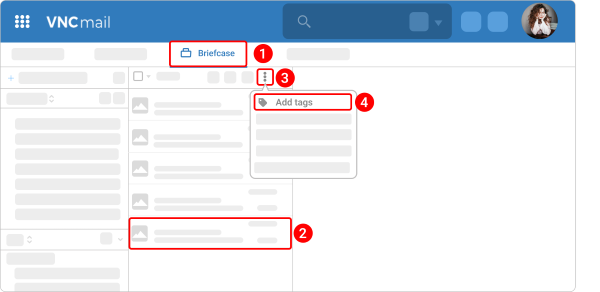
Way 1. Using the kebab menu icon.
- Go to the Briefcase tab.
- Click the file you want to add a tag to.
- In the upper right corner of the file list, click the kebab menu icon
 .
. - Select Add tags from the dropdown menu.
-
Select one of the following options:
- Go to the Add new tags tab if you want to create a new tag. Type the name of the tag and assign a color associated with it.
- Go to the Select from existing tags tab if you want to quickly add tags for the email from the current list.
Tags will appear under the "Tags" menu in the left pane, below your briefcase folders. Select a tag to filter your documents to only display files that have that tag.
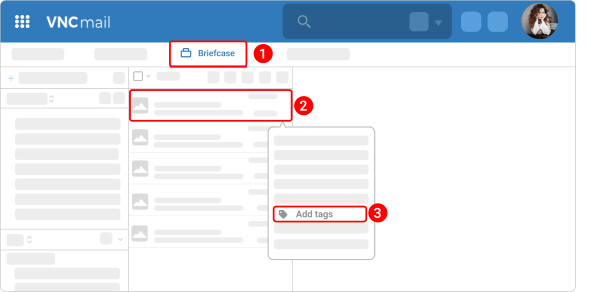
Way 2. Using the "Add tag" option.
- Go to the Briefcase tab.
- Right-click the file to be tagged.
- Select Add tags from the dropdown menu.
- The further steps are the same as for the first way of adding a tag to the file.
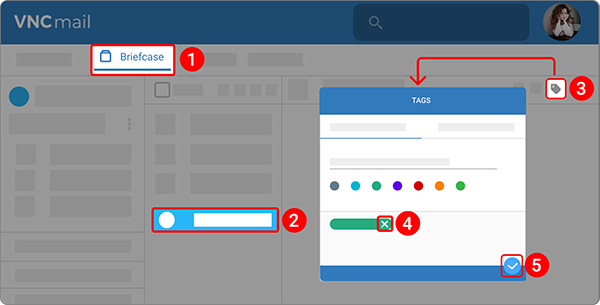
Remove a tag from a file
- Go to the Briefcase tab.
- Open the file.
- In the upper right corner of the preview pane, click the tag icon.
- Click the cross icon next to the tag you want to remove.
- When you're finished, click the checkmark
 at the bottom.
Move a file
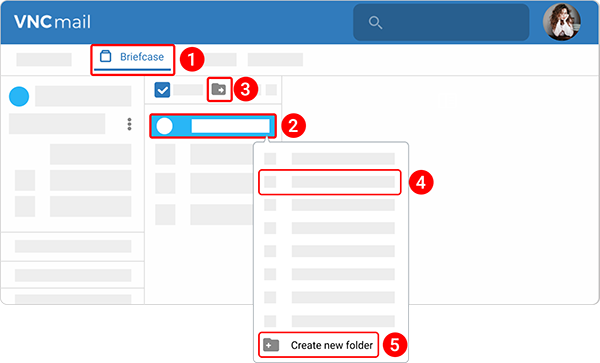
There are 2 ways to move a file into another briefcase folder.
Way 1. Using the kebab menu icon.
- Go to the Briefcase tab.
- Click the file to be moved.
- In the upper right corner of the file list, click the folder icon
 .
. - Select a destination folder.
- You can also create a new folder by clicking CREATE NEW FOLDER. Give the folder name, pick a color, and click the checkmark
 at the bottom.
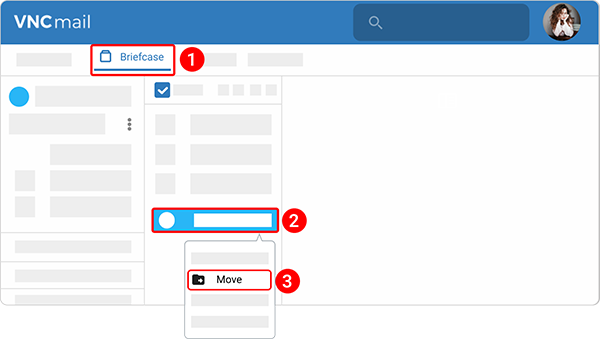
Way 2. Using the "Move" option.
- Go to the Briefcase tab.
- Right-click the file to be moved.
- Select Move from the dropdown menu.
- The further steps are the same as for the first way of moving a file into another briefcase folder.
Download a file
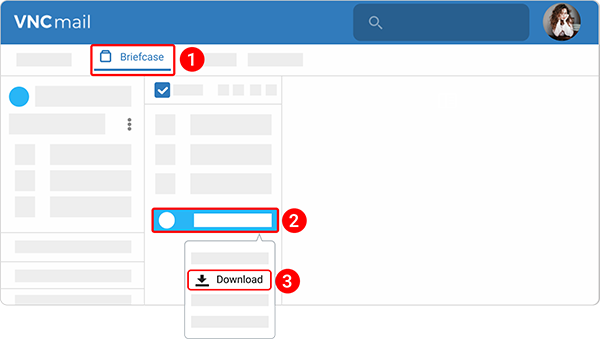
There are 2 ways to download a file from a briefcase folder.
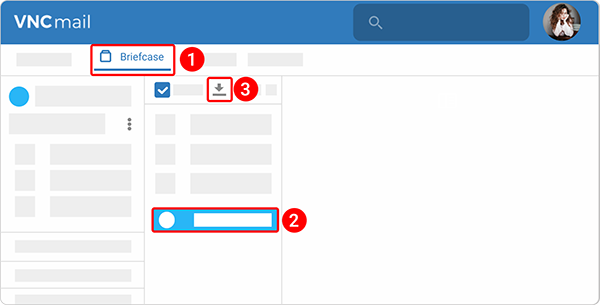
Way 1. Using the kebab menu icon.
- Go to the Briefcase tab.
- Click the file to be downloaded.
- In the upper right corner of the file list, click the download icon
 .
.
Way 2. Using the "Download" option.
- Go to the Briefcase tab.
- Right-click the file to be downloaded.
- Select Download from the dropdown menu.
- The further steps are the same as for the first way of downloading a file.
Delete a file
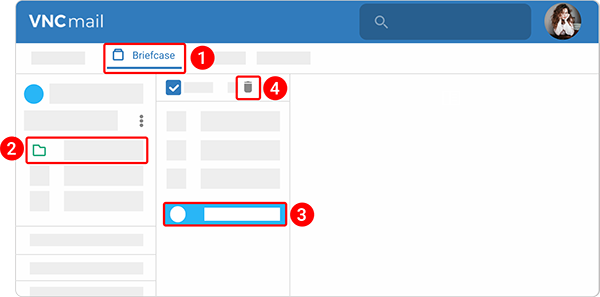
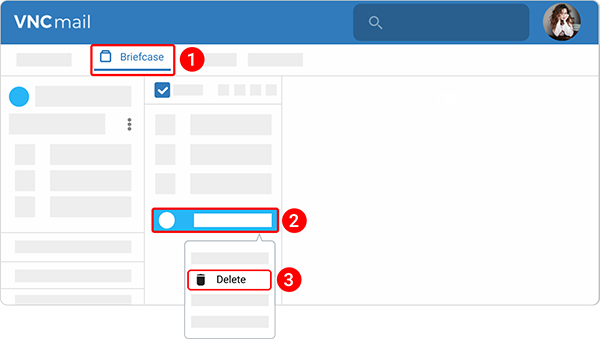
There are 2 ways to delete a file in a briefcase folder.
Way 1. Using the kebab menu icon.
- Go to the Briefcase tab.
- Click the file to be deleted.
- In the upper right corner of the file list, click the trash bin icon
 .
. - Click DELETE to confirm that you want to delete the file.
Deleted files are stored in the "Trash" folder.
Way 2. Using the "Delete" option.
- Go to the Briefcase tab.
- Right-click the file to be deleted.
- Select Delete from the dropdown menu.
- The further steps are the same as for the first way of deleting a file in a briefcase folder.
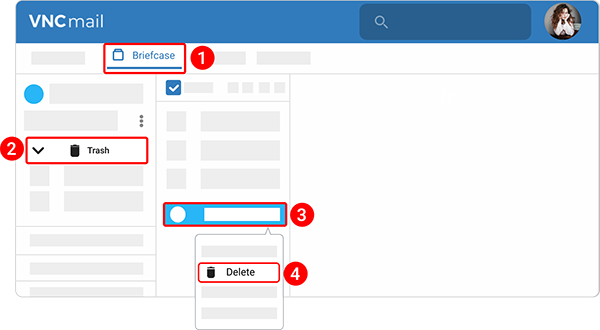
Delete a file permanently
- Go to the Briefcase tab.
- Open the Trash folder.
- Find a required file and right-click it.
- Select Delete from the dropdown menu.
- Click DELETE to confirm that you want to delete the file permanently.
Send a file from a briefcase
Send a file as an attachment
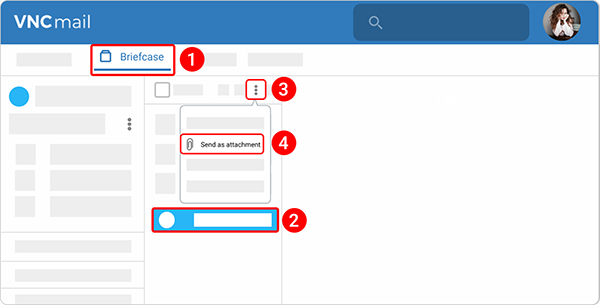
You can send a file as an attachment to an email directly from Briefcase.
- Go to the Briefcase tab.
- Click the file to be sent as an attachment.
- In the upper right corner of the file list, click the kebab menu icon
 .
. - Select Send As Attachment(s) from the dropdown menu.
- Add the recipient’s email address and complete the email message.
-
When you are finished, click:
- Send to send the email.
- Save Draft to save the email as a draft.
- Send & Seal to seal and secure the email by blockchain.
Send an email with a link to a file
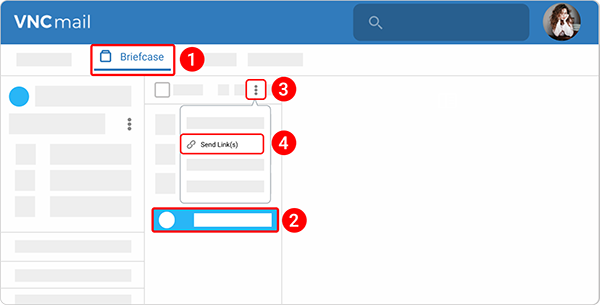
You can send an email that has a link to a file in Briefcase. The recipient must have appropriate share permission to work with the file. Any modifications made to a linked file are reflected in the file in your Briefcase folder.
- Go to the Briefcase tab.
- Click the file to be shared.
- In the upper right corner of the file list, click the kebab menu icon
 .
. - Select Send Link(s) from the dropdown menu.
- A modal window opens reminding that the recipient must have permission to view the content of the folder. Click Yes to proceed.
- Add the recipient’s email address and complete the email message.
-
When you are finished, click:
- Send to send the email.
- Save Draft to save the email as a draft.
- Send & Seal to seal and secure the email by blockchain.
Collaborate on a file
You can collaborate on a file by checking a file out, making edits as needed, and checking the updated file back in.
Check a file out
While the file is checked out, users will see a lock icon. This prevents multiple users from making changes to the file simultaneously.
- Go to the Briefcase tab.
- Right-click the file to be checked out.
- Select Checkout file from the dropdown menu.
The lock icon shows that this file is now locked and others cannot check the file out for editing.
Check a file in
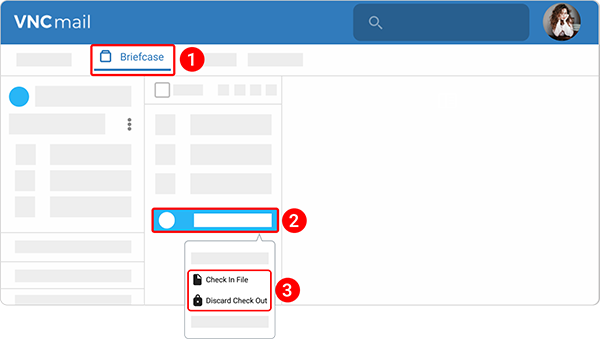
- Go to the Briefcase tab.
- Right-click the file to be checked in.
-
Select one of the following options:
- Check In File to check a file back into the briefcase
- Discard Check Out if you did not change the file.
-
You will be prompted to add notes about the version you are uploading.
Manage file versions
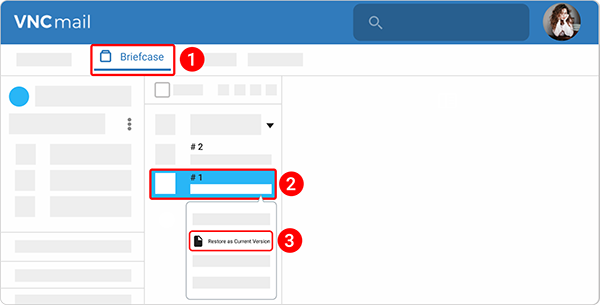
You will see each version of the file listed in the briefcase.
- Go to the Briefcase tab.
- Right-click on any early version.
- Select Restore as Current Version from the dropdown menu.
