Folders
Updated till version 3.0
Create a folder
Folders provide a way to organize email messages. You can create your own folders or use default folders:
- Inbox. All incoming emails are stored in the Inbox.
- Drafts. If you create or respond to an email, but cannot finish it right away, it will automatically be saved to your Drafts folder. You can come back to the message later to continue editing it, and then send it.
- Sent. A copy of every message you send is stored in your Sent folder.
- Starred. This folder is used for flagged emails.
- Spam. The location for storing unwanted emails.
- Trash. Deleted items are placed in the Trash folder and remain there until you manually empty the trash or until the folder is purged automatically.
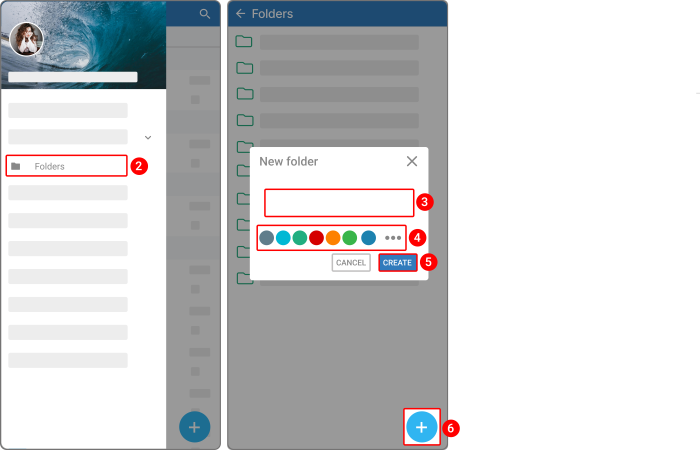
To create a folder, do the following actions:
- In the upper left corner, tap the hamburger menu icon
 .
. - Navigate to Folders.
- Tap the plus icon
 at the bottom.
 - Type a name for the folder.
-
Choose the desired color from the palette.
-
Tap CREATE.
Rename a folder
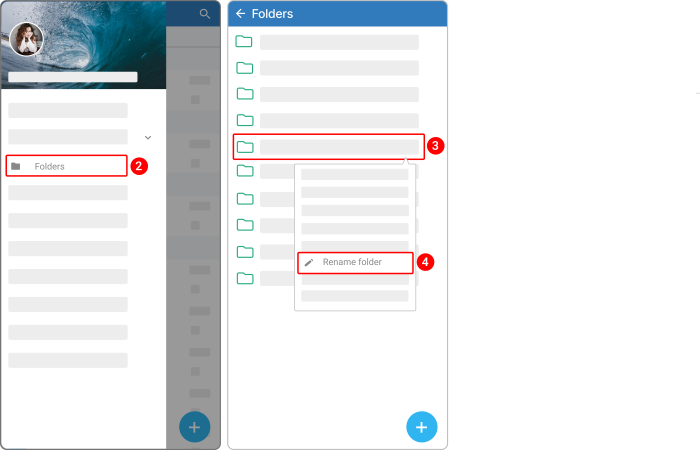
- In the upper left corner, tap the hamburger menu icon
 .
. - Navigate to Folders.
- Tap and hold the folder you want to rename.
- Select Rename Folder from the dropdown menu.
- Change the name.
- Tap RENAME.
From here, you can also change the color of a folder.
Delete a folder
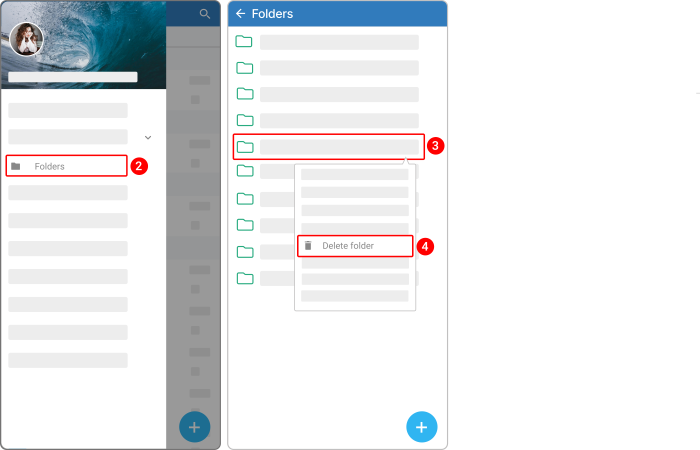
- In the upper left corner, tap the hamburger menu icon
 .
. - Navigate to Folders.
- Tap and hold the folder you want to delete.
- Select Delete Folder from the dropdown menu.
- Confirm that you want to delete the folder, tap DELETE in the modal window.
Empty a folder
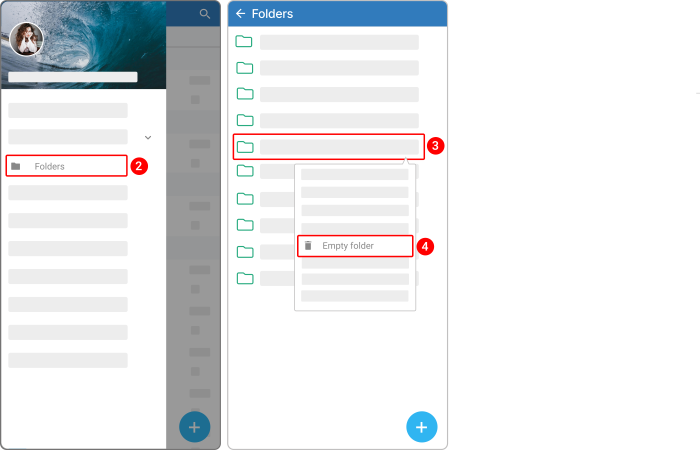
- In the upper left corner, tap the hamburger menu icon
 .
. - Navigate to Folders.
- Tap and hold the folder you want to empty.
- Select Empty Folder from the dropdown menu.
- Confirm that you want to empty the folder, tap OK in the modal window.
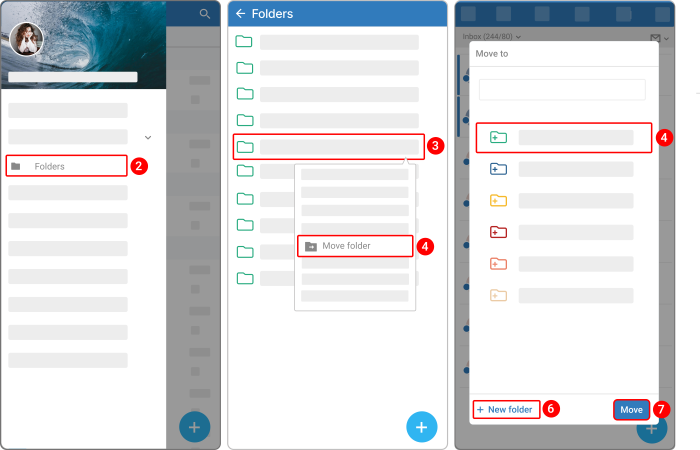
Move a folder to another folder
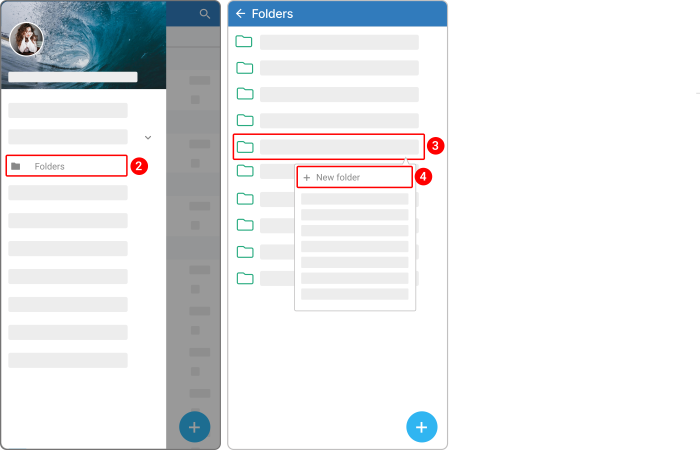
VNCmail organizes folders in chronological order (from oldest to newest), except for the Inbox, Drafts, Sent Items, and Deleted Items folders, which appear first. VNCmail allows you to nest folders inside other folders so that you can group similar folders.
- In the upper left corner, tap the hamburger menu icon
 .
. - Navigate to Folders.
- Tap and hold the folder you want to move.
- Select Move Folder from the dropdown menu.
- Select the destination folder.
- You can also create a new folder by tapping + New folder. Give the folder name and pick a color to sort your folders in an organized manner.
- Tap Move.
Share a folder
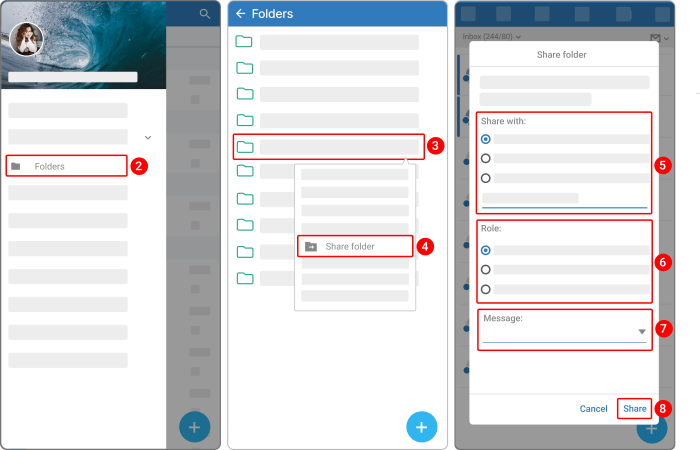
Folder sharing allows you to share an entire folder of email messages with your organization members and external users. You can also specify the level of sharing you want to grant to shared folders. For instance, you can give a user read-only permissions and other users edit permissions.
- In the upper left corner, tap the hamburger menu icon
 .
. - Navigate to Folders.
- Tap and hold the folder you want to share.
- Select Share Folder from the dropdown menu.
- Under the Share with section, select whether you want to share with external guests or other users of VNCmail.
-
Depending on with whom you share, do the following:
- For Internal users, enter the user’s email addresses. Under the Role section, select the access privileges.
- For External guests, enter the user’s email addresses. External guests are sent an email message with a link to the shared item. They create a display name and password the first time they go to view the shared item.
-
Set the sending parameters:
- Do not send mail about this share. If you do not want the users to get the notification message when you share a folder with them.
- Send standard message. If you want the users to get the notification message when you share a folder with them
- Add note to standard message. If you want to add a note to the notification message. If you select this option, you should fill in the appeared Message field
-
Tap Share.
Change access to a shared folder
You can change the share privileges that you have assigned to a user.
- In the upper left corner, tap the hamburger menu icon
 .
. - Navigate to Folders.
- Tap and hold the folder you want to change access to.
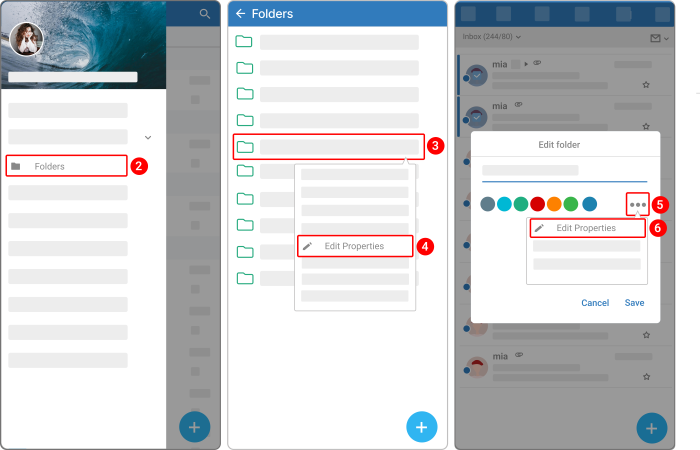
- Select Edit Properties from the dropdown menu.
- Under the Sharing for this folder section, you see the names that share the folder. Tap the kebab menu icon
 next to the name to change.
 - Select Edit to change the privileges. You can temporarily disable access to a shared folder without revoking the share privileges by selecting None.
- Choose whether you want to inform the user via email and tap Share.
- Tap Save.
Remove access to a shared folder
- In the upper left corner, tap the hamburger menu icon
 .
. - Navigate to Folders.
- Tap and hold the folder you want to remove access to.
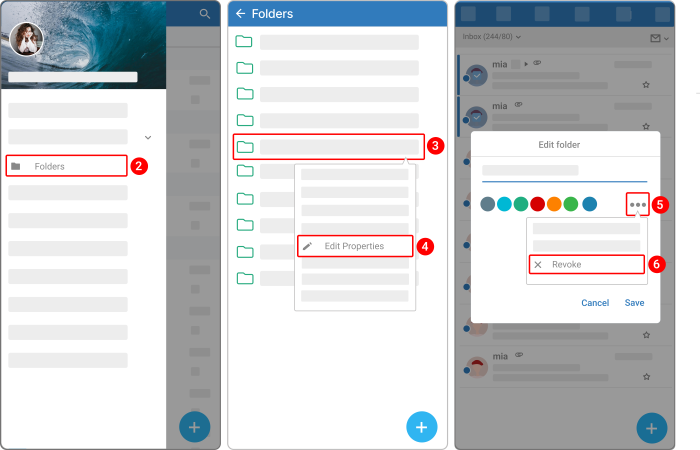
- Select Edit Properties from the dropdown menu.
- Under the Sharing for this folder section, you see the names that share the folder. Tap the kebab menu icon
 next to the name to change.
 - Select Revoke.
- Select whether to send a standard message or to add a note to your message and then tap Revoke.
- Tap Save.
Create a subfolder
To help keep your emails organized, you can create subfolders.

