Tickets
Quick overview of Ticket
In VNCproject, teams use tickets to keep track of individual pieces of work that need to be completed. Based on how your organization utilizes VNCproject, a ticket could represent an assigned task, a support complaint, a leave request form, etc.
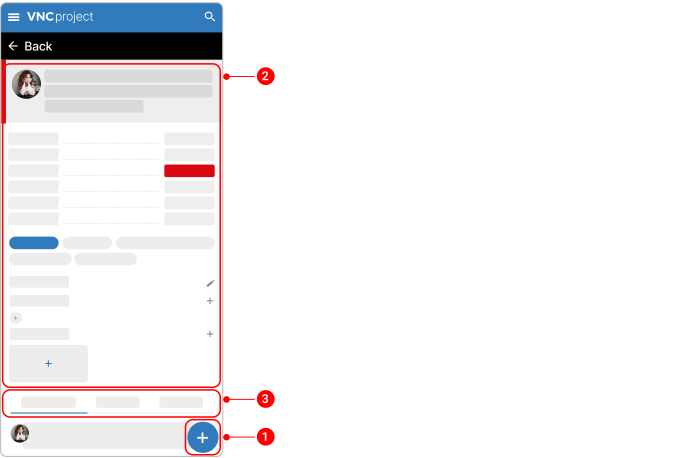
A ticket consists of three key components:
- Ticket actions: Edit a ticket, clone it, log time spent working on it, and perform other actions.
- Ticket details: See the ticket details such as assignee, description, status, etc., add attachments to the ticket, relate tickets together, and more.
- Ticket activity: See the whole ticket history, so you can get a better grasp on how the ticket was changing in the past.
Create a ticket
Users can create tickets within projects if given permission (managed by administrators at Administration > Roles and permissions).
Tickets are the most common items in VNCproject. A ticket can be added to a specific project.
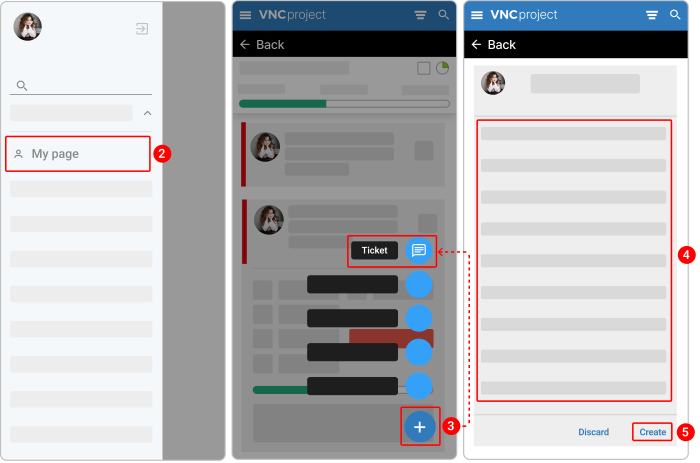
- In the upper left, tap the hamburger menu icon
 .
. - Naviagte to My page.
- Tap the plus icon
 and then select Ticket.
 -
Fill in all required fields and any other fields that you want:
- In the Subject field, type the name of the ticket.
- In the Estimated time field, determine the time required to complete a ticket.
- In the Done Ratio field, select the percentage of task complete. The Done ratio section shows the time logged so far, and the time remaining.
- From the Project dropdown, you can change the project you want to add a ticket to.
- Check the box next to Private if you want to limit project members or users can view the ticket. The users who can view are watchers, assignees, project managers, administrators, and authors.
- In the Description field, write the resume of the ticket.
- In the Status field, select the status. If you are creating a new ticket, you need to set the status to "New". However, you can update the status of the ticket later on.
- Assign the ticket to a user.
- Set the start date and due date of the ticket.
- In the Target version field, select the target version where the ticket is in. You can also create a new target version by tapping the plus icon next to the Target version field.
- In the Priority field, set the priority to Immediate, Urgent, High, Normal, and Low.
- In the Analytical Account field, select the analytical project to which the project was created.
-
Tap Create.
Add recurrence to a ticket
Recurring tickets repeat over a specified interval of time. To make a ticket recurring, add recurrence to it.
- Open a ticket.
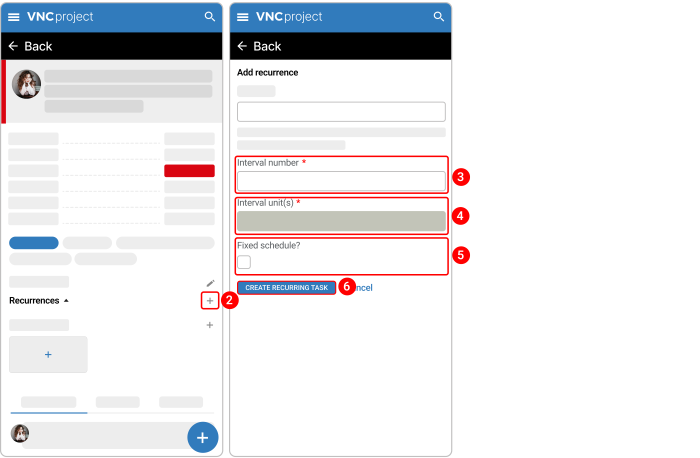
- Under the Recurrences section, tap the plus icon
 . You will be redirected to the Add recurrence page.
 - Fill in the Interval Number field. This is an integer greater than 0 that specifies how often a ticket repeats. For example, if the recurrence rule is a weekly recurrence rule and its interval is 1, then the pattern repeats every week. If the recurrence rule is a monthly recurrence rule and its interval is 3, then the pattern repeats every three months.
- Fill in the Interval Units field. This is a value that indicates whether the recurrence rule is daily, weekly, monthly, or yearly.
- Check the box next to Fixed schedule if you want to schedule your ticket.
- Tap Create recurring task.
- You can edit or delete a recurring ticket by tapping the pencil icon
 or trash icon
  next to it.
Relate tickets together
There may be existing tickets that relate to the one you're working on, and their details can help add more context.
- Once you add the related tickets, they will appear in the Related Tickets section.
- The Related tickets section is visible on both the original ticket and the related ticket.
- Tapping the related ticket will open the ticket in a new tab on your browser for easier viewing.
To relate tickets together:
- Open a ticket.
- Under the Related tickets section, tap the plus icon
 .
. - From the Related to dropdown menu, select the type of relation between tickets.
- In the Ticket # field, enter the number of the ticket to be linked.
- Tap Add.
Delete a linked relation between tickets
Perform actions on a related ticket
- Open a ticket.
-
Under the Related tickets section, tap the kebab menu icon
 next to the linked ticket to perform the following actions on it:
 - Edit a ticket
- Change status, type, priority, target version, assignee, % done, analytic account, and story points.
- Add tags
- Log time
- Copy a ticket
- Delete a ticket
Relate a ticket and meta task together
If a meta task was assigned to you, you can relate a meta task and a ticket while editing the one.
- Open a ticket.
- Under the Related meta tasks section, tap the plus icon
 .
. - In the Meta task # field, enter the number of the task to be linked.
- Tap Add.
Add an attachment to a ticket
- Open a ticket.
- Under the Attachments section, tap the plus icon
 .
. - Select a required file/ image from your computer.
Download attachments in a ticket
- Open a ticket.
- Under the Attachments section, tap a file/ image you want to download and then the download icon
 .
.
Delete attachments in a ticket
The deletion process is non-reversible and hence must be exercised with caution.
- Open a ticket.
- Under the Attachments section, tap a file/ image you want to delete and then the trash bin icon
 .
.
Add a tag to a ticket
You can add a tag to a ticket to make the ticket easier to find.
There are 2 ways to add a tag to a ticket.
Way 1. From the "Ticket Details" page.
Way 2. From the ticket list.
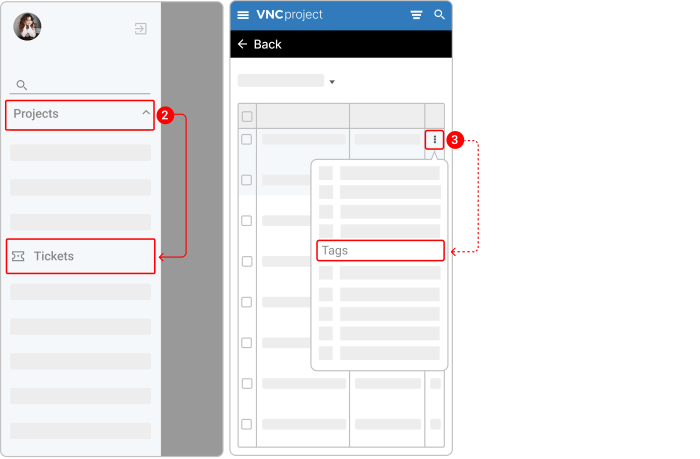
- In the upper left, tap the hamburger menu icon
 .
. - Navigate to Project > Tickets.
- Tap the kebab menu icon
 next to a required ticket and then select Tags.
 - Start entering a required tag and then select it.
- Tap Save.
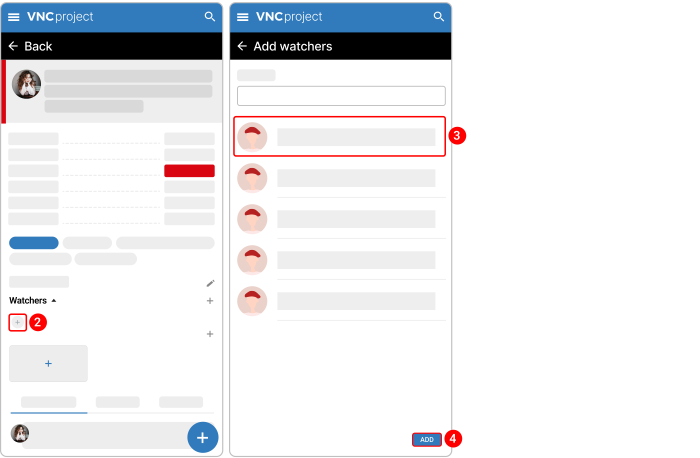
Add a watcher to a ticket
You can also add watchers to make sure they arere informed of important ticket updates.
- Open a ticket.
- Under the Watchers section, tap the plus icon
 .
. - Search for and select a user you want to assign as a watcher.
- Tap Add.
- To remove a watcher from a ticket, tap the watcher and then the cross icon.
The selected watcher/ watchers will now automatically receive a message if the ticket is edited or its status changes.
Edit a ticket
There are 2 ways to edit a ticket.
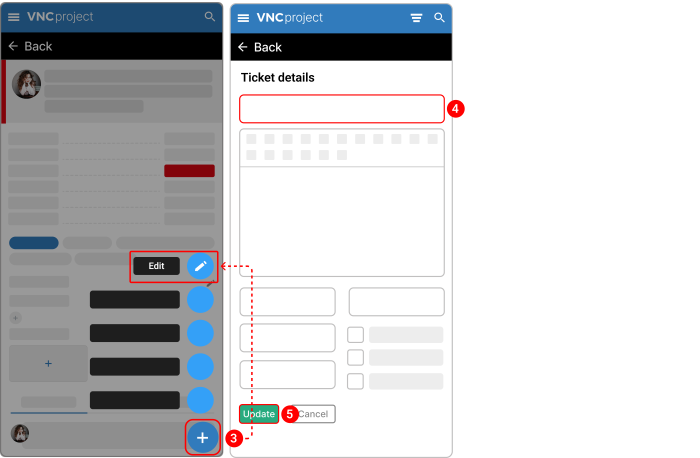
Way 1. Using the "Edit" button.
- Open the ticket.
- Tap the plus icon icon
 and then select Edit. You will be redirected to the "Edit Ticket" page.
 - Modify the ticket details.
- Tap Update.
Way 2. Without going to the "Edit Ticket" page.
- Open a ticket.
- Tap the field you want to update.
There's also no need to press save when you edit ticket details, as whatever you enter is saved as soon as you tap a field.
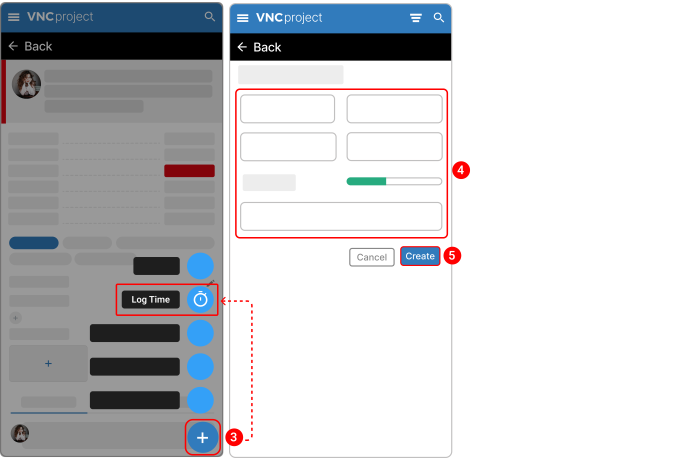
Log time on a ticket
VNCproject makes it easy for you to keep track of time spent on your tickets. This will let you compare your original estimate with how long it took to resolve the issue.
- Open a ticket.
- Tap the plus icon icon
 and then select Log time. The Log Time modal box will open.
 - Fill in the Hours and Comments fields.
- (Optional) Complete any other fields.
- Tap CREATE.
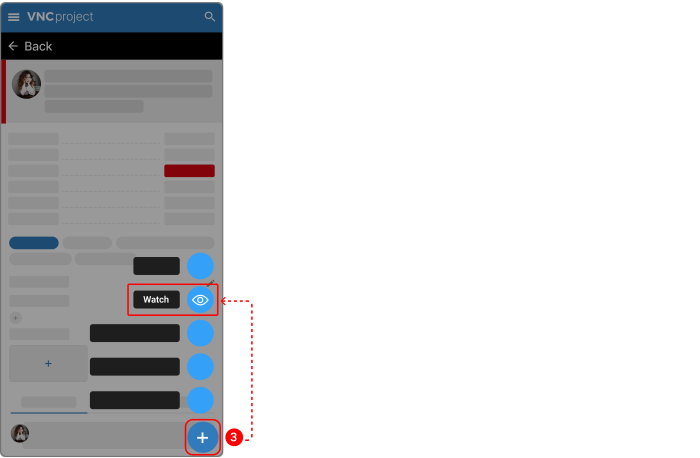
Watch/ unwatch a ticket
Watching means you receive notifications when things happen on a ticket. For example, when someone comments on or edits the ticket, you'll receive notifications in VNCtalk.
- Open a ticket.
- Tap the plus icon icon
 and then select Watch.
 - To unwatch a ticket, tap the plus icon icon
 and then select Unwatch.
Clone a ticket
If you ever need to create a duplicate of a ticket, there’s no need to do everything manually. Cloning enables you to duplicate a ticket, copying over most information from a ticket like the "Subject" and "Description" fields and more.
Cloned tickets exist as a separate entity from the original ticket. Their only connection is that, upon cloning, the two tickets are linked — though you can unlink them at any time.
- Open a ticket.
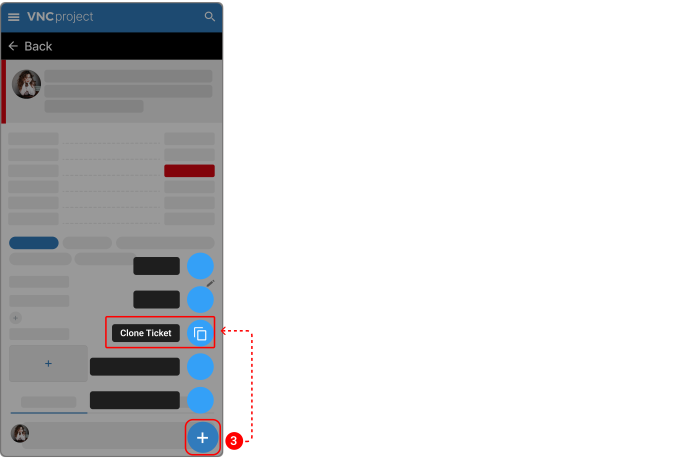
- Tap the plus icon icon
 and then select Clone Ticket. You'll be redirected to the New Ticket page.
 - Edit the information as needed.
- Uncheck the box next to Link copied issue if you want to unlink two tickets.
- Tap CREATE.
Delete a ticket
To delete the tickets, you should have delete tickets permission enabled. When the ticket is deleted, the following ticket-related items are also deleted:
- Attachments
- Comments and notes
- Ticket activity entries
To delete a ticket:
- Open a ticket.
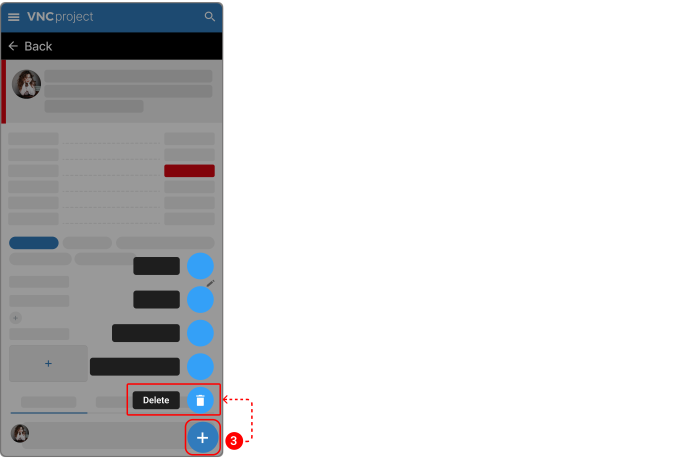
- Tap the plus icon icon
 and then select Delete.
 - Tap OK in the delete confirmation dialogue box to permanently remove the ticket.
Export a ticket as PDF
You can export tickets in the standard business document file format to share, print, and email them.
- Open a ticket you want to export as PDF.
- Scroll down to the bottom and tap PDF.
Comment on a ticket
Comments can range from simple text updates to let watchers know what's happening on the issue, to code snippets, images, tables, and more.
- Open a ticket.
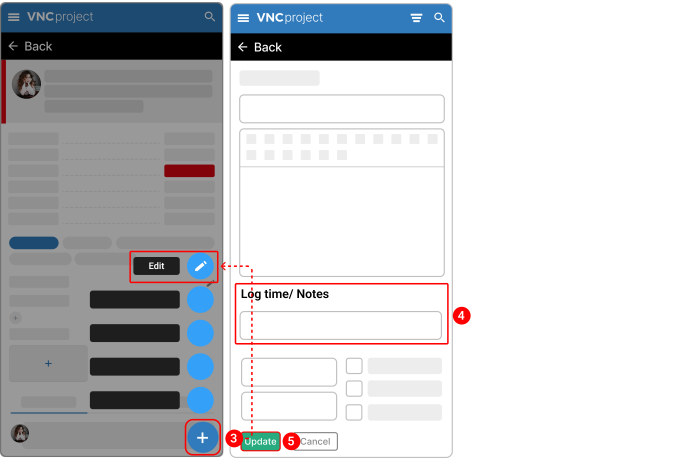
- Tap the plus icon icon
 and then select Edit. You'll be redirected to the "Edit Ticket" page.
 - In the Log time/ Notes box, type your comment.
- Tap Update.
Mention your teammates
If you need someone to know about a comment, you can mention them in it. Type @ followed by their name, then choose the right person from the list. The person you mention will be notified about your comment and can quickly jump to the ticket to see what's happening.
Make a comment private
If your comment is only meant for a specific group or project role, you can make your comment private by checking the box next to Private notes.
Quote a comment
If you want to respond to a specific comment rather than just leave a new comment directly at the bottom of a ticket, you can create a comment thread for this purpose.
- In the upper right corner of the comment you want to respond to, tap the quotation mark.
- Tap into the text box at the bottom of this comment thread and start creating your response.
- Tap Update.
Edit a comment
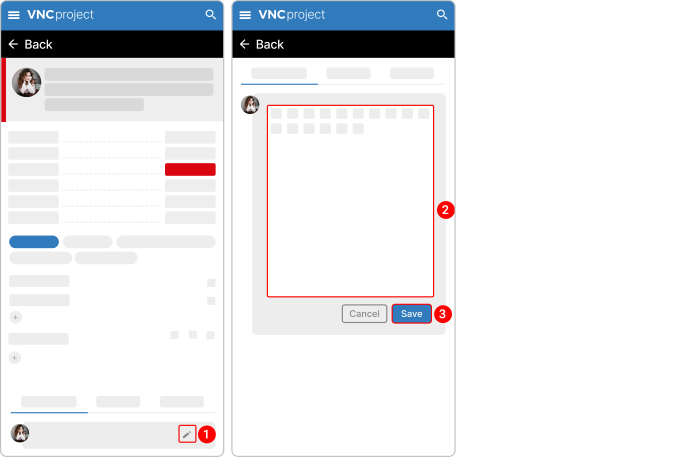
You can edit an existing comment you wrote on a ticket.
