VNCproject Meta Roadmap Feature
Getting Started
Quick overview of Meta Roadmaps
The "Meta Roadmap" feature within VNCproject allows team members and management to get the big picture on the current state of the project that helps assess and organize the work to be executed by the team.
Meta Roadmap are made up of three hierarchical components.
- Roadmaps are useful for planning large pieces of work several months in advance within a single project. Simple planning and dependency management features help your teams visualize and manage work better together.
- Meta tasks are a high-level description of what you want to achieve, but not the detailed planning itself which is done in a given target version or one or more tickets.
- Tickets are steps required to achieve the goal. They can be added directly from the roadmap and are nested within the meta task they belong to.
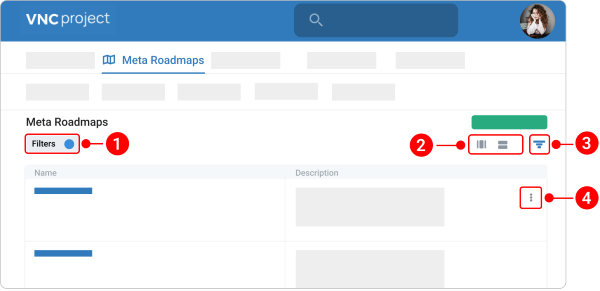
In the top navigation menu, click Meta Roadmaps to see the list of existing meta roadmaps. From here, you can find a required meta roadmap, filter search results, change the view of meta roadmaps, and add or rearrange the columns that will be displayed in your meta roadmap.
- Filters. You can sort existing meta roadmaps by status, name, description, and date when the meta roadmap was created or updated.
- Meta Roadmaps View. Meta roadmaps can be displayed in two ways — detailed view
 or compact view
  . Click the respective icon to change the view of meta roadmaps.
- Columns. The columns property specifies which columns you would like the meta roadmap to divide into.
- Action Menu. Click the kebab menu icon
 to open the list of the available actions you can perform on a meta roadmap.
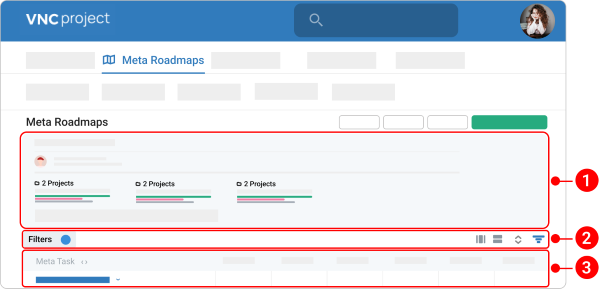
Once the new meta roadmap has been created or you open an existing one by clicking on it on the overview screen, the respective meta-roadmap opens, displaying the information, illustrated here:
-
Meta Roadmap Info. The top section of your roadmap shows the following information:
- Roadmap's subject. Displays the title of the meta roadmap.
- Author. Displays the username who created the meta roadmap.
- Description. Displays the meta roadmap's description.
- Project. Displays the number of projects and shows statistics for tickets created for projects.
- Version. Displays the number of versions and shows statistics for tickets assigned to the versions.
- Tickets. Displays the number of tickets attached to the meta task and shows statistics for them.
- Time tracking report. Shows overall time tracking information on tickets for all versions of all projects.
-
Filters and view settings. Meta roadmap has built-in filters that make viewing and managing work simple.
- You can sort meta tasks by completion percentage, priority, status, type, title, scope, mockups URL, next action, comment, task owner, and due date. You can also group results by type, status, priority, task owner, start date, due date, and completion percentage.
- Choose whether to hide or expand the description that the meta tasks contain.
- Specify which columns you would like the task to divide into.
- In order to see what operations you can perform on a roadmap, you own or have the proper rights for, go back to the overview screen.
-
Meta tasks and tickets. A meta task is a large body of work that can be broken down into tickets. Tickets can be nested within the meta task they belong to. The most common tickets are incidents, tasks, and bugs.
Create a meta roadmap
There are 2 ways to create a meta roadmap.
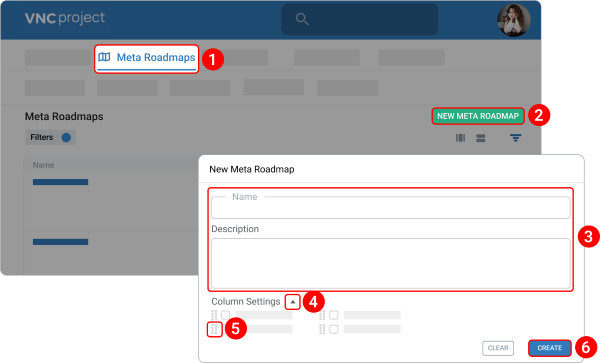
Way 1. From the top navigation menu.
- In the top navigation menu, navigate to Meta Roadmaps.
- Click the NEW META ROADMAP button.
- Enter a roadmap name and description.
- Click the down arrow
 next to Column settings and select the columns you want to have displayed in your meta roadmap by checking the box next to the respective item.
 - Hold down the left mouse button on the customize columns icon
 to rearrange the items as you please.
 - Click CREATE.
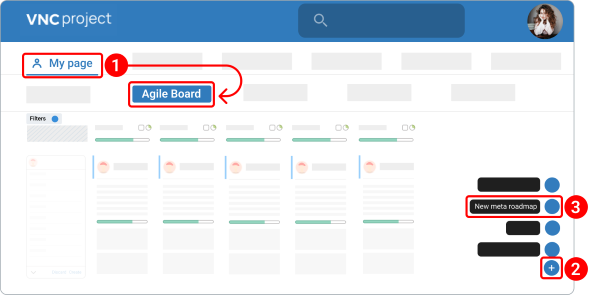
Way 2. From the Agile Board.
- Navigate to My page > Agile board.
- At the bottom, click the plus icon
 .
. - Select New meta roadmap.
- The further steps are the same as for the first way of creating a meta roadmap.
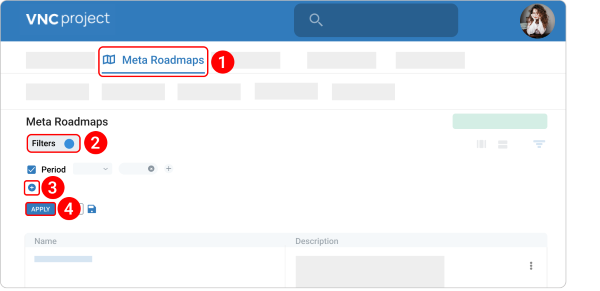
Filter meta roadmaps
You can narrow your search results to find exactly what you want.
- In the top navigation menu, navigate to Meta Roadmaps.
- Click Filters.
-
Click the plus icon and select the attribute you want to filter:
- Status (by default)
- Name
- Description
- Author
- Date when the roadmap was created
- Date when the roadmap was updated
-
Click Apply.
Customize meta roadmap view
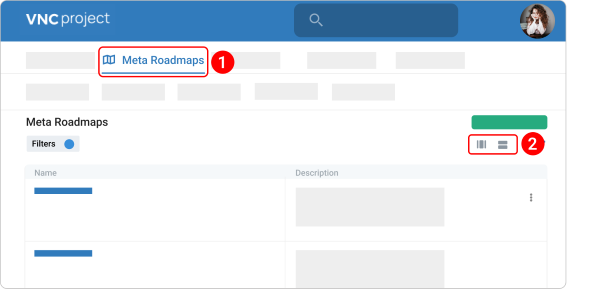
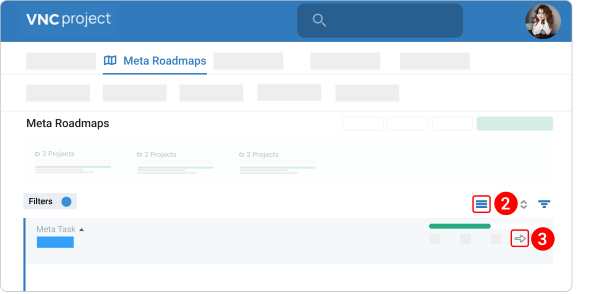
Meta roadmaps can be displayed in two ways — detailed view or compact view.
- In the top navigation menu, navigate to Meta Roadmaps.
-
Select one of the following icons:
Add columns to meta roadmaps
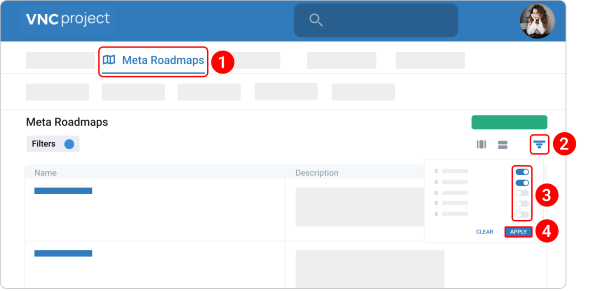
You can add and rearrange the columns that will be displayed in your meta roadmap.
- In the top navigation menu, navigate to Meta Roadmaps.
- Click the column customization icon
 .
. -
Switch the toggle on/ off next to the column you want to enable/ disable:
- Status. Switch on if you want to see the meta roadmap's status - closed or active.
- Author. Switch on if you want to see the meta roadmap's owner.
- Updated. Switch on if you want to see the date when the meta roadmap was edited last time.
- Created. Switch on if you want to see the date when the meta roadmap was created.
- Roadmap Numebr (#). Switch on if you want to see the Meta Roadmap DB ID column.
-
Click Apply.
Roadmap Operations
Edit a meta roadmap
There are 3 ways to edit a meta roadmap.
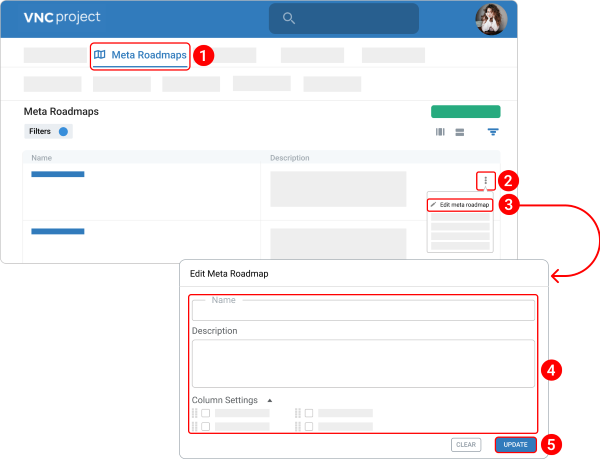
Way 1. Using the kebab menu icon.
- In the top navigation menu, navigate to Meta Roadmaps.
- Click the kebab menu icon
 next to the required meta roadmap.
 - Select Edit meta roadmap from the dropdown menu.
- Make your changes.
- Click UPDATE.
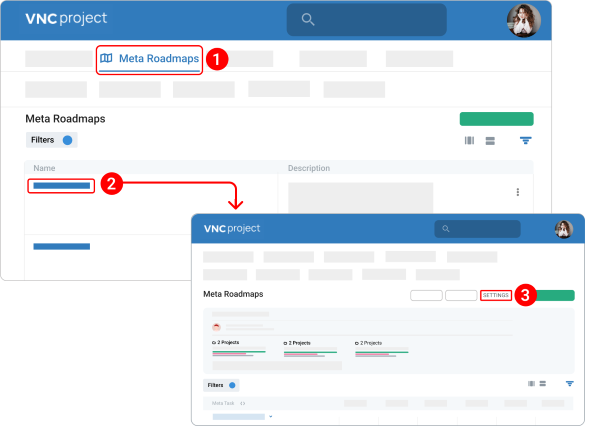
Way 2. Using the "Settings" button.
- In the top navigation menu, navigate to Meta Roadmaps.
- Open the meta roadmap you want to edit.
- In the upper right corner, click the SETTINGS button.
- The further steps are the same as the first way of editing a meta roadmap.
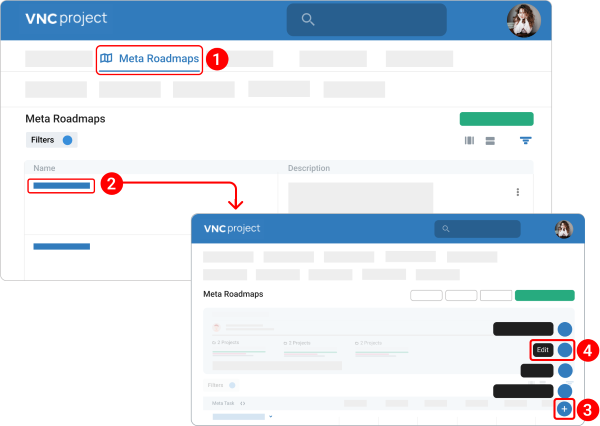
Way 3. Using the plus icon.
- In the top navigation menu, navigate to Meta Roadmaps.
- Open the meta roadmap you want to edit.
- At the bottom, click the plus icon
 .
. - Select Edit.
- The further steps are the same as the first way of editing a meta roadmap.
Rename a meta roadmap
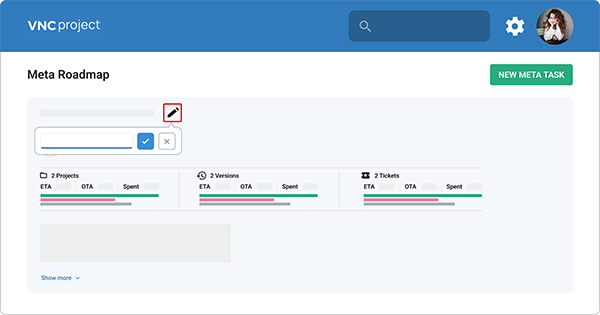
You can rename a roadmap in one click.
- Open the meta roadmap you want to edit.
- Hover over the roadmap name and click the pencil icon
 that appears.
 - Edit the data.
- Click the checkmark icon to save your changes.
- If you don’t want to save changes, click the cancel icon and the roadmap name will be left as is.
Edit a meta roadmap description
You can change a roadmap description in one click.
- Open the meta roadmap you want to edit.
- Hover over the roadmap description and click the pencil icon
 that appears.
 - Edit the data.
- Click the checkmark icon to save your changes.
- If you don’t want to save changes, click the cancel icon and the roadmap description will be left as is.
Delete a meta roadmap
After you delete a meta roadmap, you will not be able to restore it.
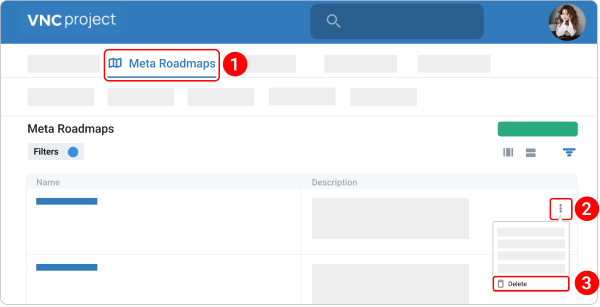
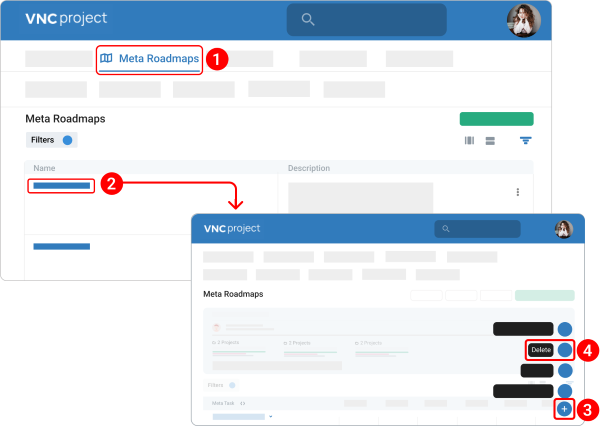
There are 2 ways to delete a meta roadmap.
Way 1. Using the kebab menu icon.
- In the top navigation menu, navigate to Meta Roadmaps.
- Click the kebab menu icon
 next to the required meta roadmap.
 - Select Delete from the dorpdown menu.
- Confirm that you want to delete the meta roadmap, click YES in the modal window.
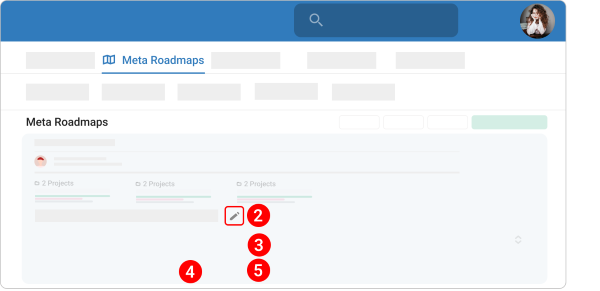
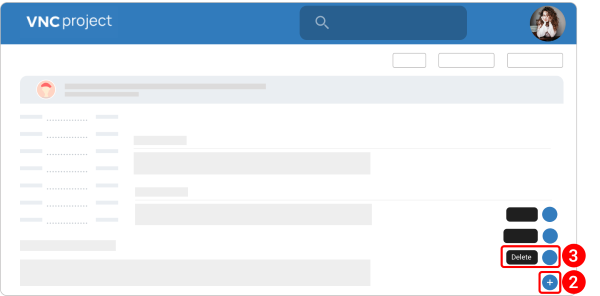
Way 2. Using the plus icon.
- In the top navigation menu, navigate to Meta Roadmaps.
- Open the meta roadmap you want to delete.
- The further steps are the same as the first way of deleting a meta roadmap.
Close a meta roadmap
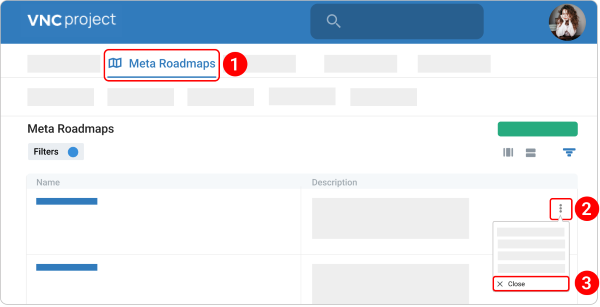
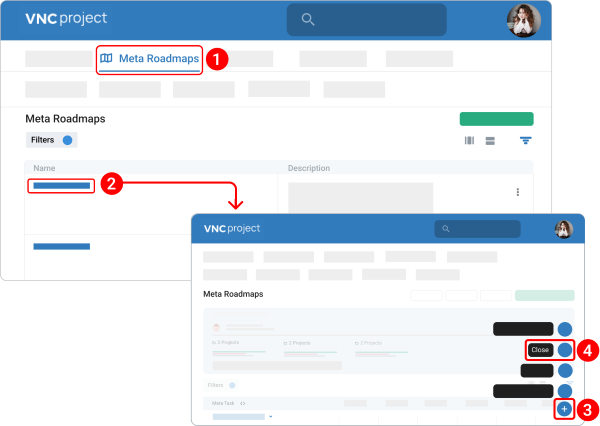
There are 2 ways to close a meta roadmap.
Way 1. Using the kebab menu icon.
- In the top navigation menu, navigate to Meta Roadmaps.
- Click the kebab menu icon
 next to the required meta roadmap.
 - Select Close from the dropdown menu.
- Confirm that you want to close the meta roadmap, click YES in the modal window.
- To stop the closing process click CANCEL.
Way 2. Using the plus icon.
- In the top navigation menu, navigate to Meta Roadmaps.
- Open the meta roadmap you want to close.
- At the bottom, click the plus icon
 and select Close.
 - The further steps are the same as the first way of closing a meta roadmap.
Archive a meta roadmap
The Archive operation will hide the meta roadmap from the active display and will move it to the list of archived roadmaps.
There are 2 ways to archive a meta roadmap.
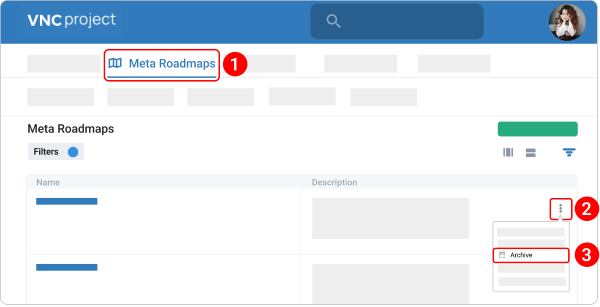
Way 1. Using the kebab menu icon.
- In the top navigation menu, navigate to Meta Roadmaps.
- Click the kebab menu icon
 next to the required meta roadmap.
 - Select Archive from the dropdown menu.
- Confirm that you want to archive the meta roadmap, click YES in the modal window.
- To stop the archiving process click CANCEL.
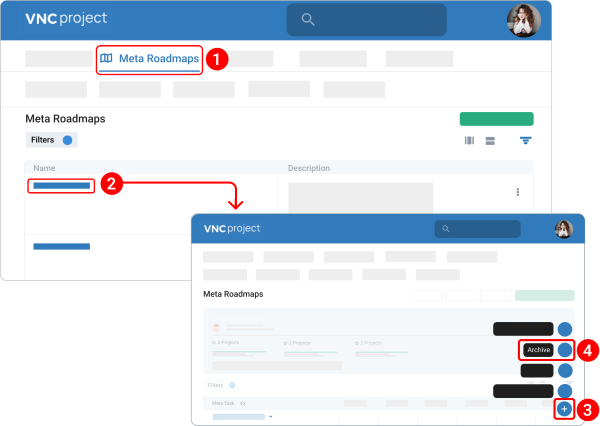
Way 2. Using the plus icon.
- In the top navigation menu, navigate to Meta Roadmaps.
- Open the meta roadmap you want to archive.
- At the bottom, click the plus icon
 and select Archive.
 - The further steps are the same as the first way of archiving a meta roadmap.
View archived roadmaps
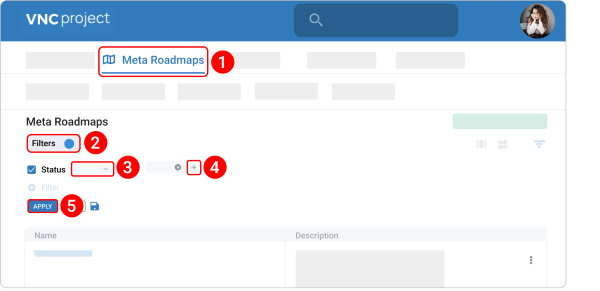
- In the top navigation menu, navigate to Meta Roadmaps.
- Click Filters.
- Under the Status filter, select is from the first dropdown menu.
- Click the plus icon
 and select archived.
 - Click Apply.
Clone a meta roadmap
If you ever need to create a duplicate of a roadmap, there’s no need to do everything manually.
In the cloning process, the following information from the original roadmap is automatically cloned roadmap name and description.
- Keep in mind that the prefix Copy is automatically added to the Name of a cloned topic. You can remove the Copy prefix while editing a meta roadmap.
- All cloned meta roadmaps are stored in the meta roadmaps' list.
There are 3 ways to clone a roadmap.
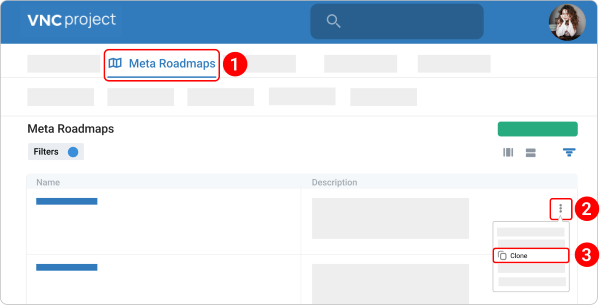
Way 1. Using the kebab menu icon.
- In the top navigation menu, navigate to Meta Roadmaps.
- Click the kebab menu icon
 next to the required meta roadmap.
 - Select Clone from the dropdown menu.
- Make your changes.
- Click CREATE.
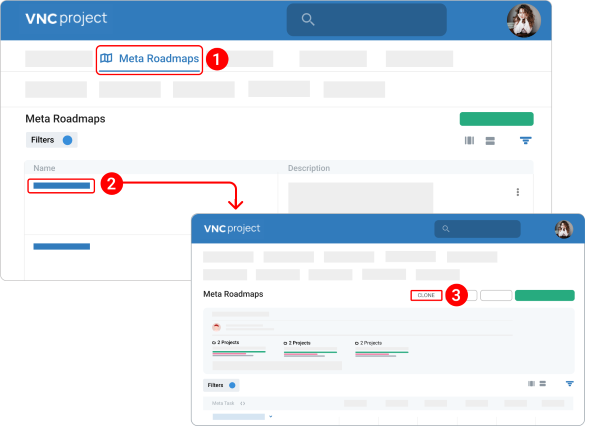
Way 2. Using the "Clone" button.
- In the top navigation menu, navigate to Meta Roadmaps.
- Open the meta roadmap you want to clone.
- In the upper right corner, click the CLONE button.
- The further steps are the same as the first way of editing a meta roadmap.
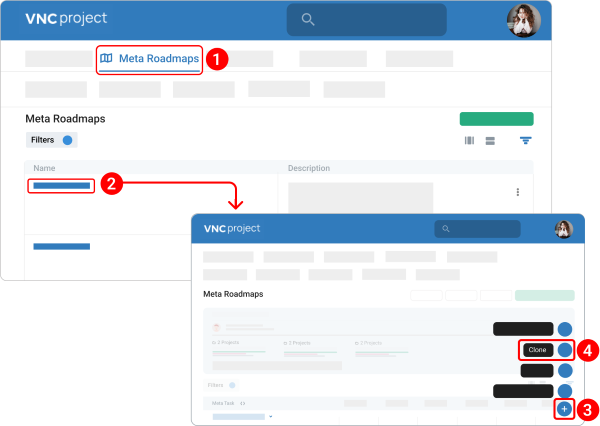
Way 3. Use the plus icon.
- In the top navigation menu, navigate to Meta Roadmaps.
- Open the meta roadmap you want to clone.
- At the bottom, click the plus icon
 and select Clone.
 - The further steps are the same as the first way of cloning a meta roadmap.
Share a meta roadmap
In case you have the proper rights to the roadmap provided by the owner or you are the owner, you have also the option to Share the meta roadmap. You can control whether users can edit, comment on, or only view the file.
There are 2 ways to share a meta roadmap.
Way 1. Using the "Share" button.
- In the top navigation menu, navigate to Meta Roadmaps.
- Open the meta roadmap you want to share with.
- In the upper right corner, click the SHARE button.
- From the Search User field, search for a user you want to share with.
- Select which permissions you want to grant a user.
- Click SHARE.
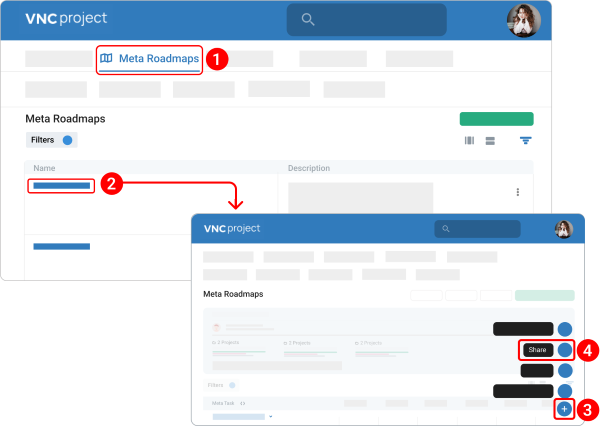
Way 2. Using the plus icon.
- In the top navigation menu, navigate to Meta Roadmaps.
- Open the meta roadmap you want to share with.
- At the bottom, click the plus icon
 .
. - Select Share.
- The further steps are the same as the first way of sharing a meta roadmap.
Meta Tasks
Create a meta task
You can create and add Meta tasks to an existing roadmap:
- Open a meta roadmap to which you want to add a new meta task.
- At the bottom, click the plus icon
 .
. - Select Add meta task.
-
Fill in all required fields and any other fields that you want:
- In the Meta task subject field, type the name of the meta task.
- In the OTA field, determine the time required to complete a task.
- In the Done Ratio field, select the percentage of the task complete. The "Done ratio" section shows the time logged so far, and the time remaining.
- In the Description field, write the resume of the task.
- In the Status field, select the status. If you are creating a new task, you need to set the status to "New". However, you can update the status of the task later on.
- In the Type field, select the type of the meta task.
- Select a task owner.
- Set the start date and due date of the ticket.
- In the Priority field, set the priority to Immediate, Urgent, High, Normal, and Low.
- In the Subproject of field, enter the ID of the respective project, if you desire to add this task as a subproject to an existing project.
-
Click CREATE.
Once done, your new meta task will be displayed in the meta roadmap.
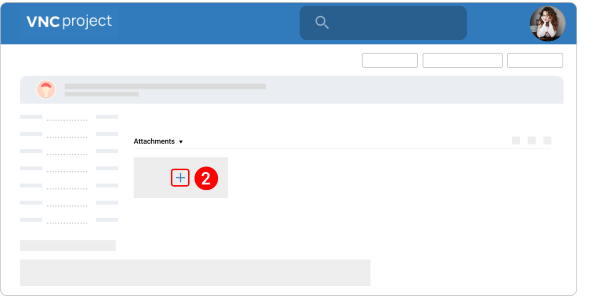
Add an attachment to a meta task
- Open a meta task.
- Scroll down to the Attachments section and click the plus icon
 .
. - Select a required file/ image from your computer.
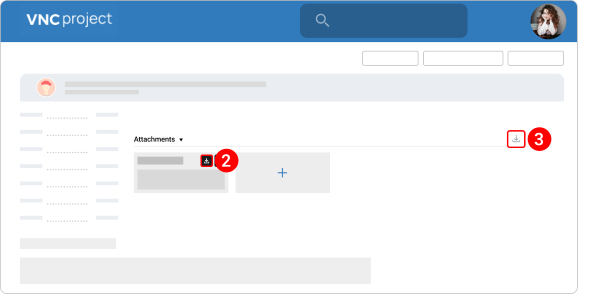
Download attachments in a meta task
- Open a meta task.
- Under the Attachments section, hover the pointer over a file/ image you want to download and click the download icon
 .
. - (Optional) You can download all of the attachments at once. Click the download icon
 in the upper right corner of the Attachments section.
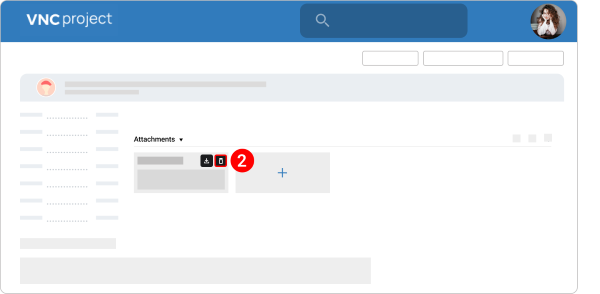
Delete attachments in a meta task
The deletion process is non-reversible and hence must be exercised with caution.
- Open a meta task.
- Under the Attachments section, hover the pointer over a file/ image you want to delete and click the trash bin icon
 .
.
Relate a ticket and meta task together
There may be existing tickets that relate to the task you are working on, and their details can help add more context.
- Once you add a relation between a ticket and a task, they will appear under the Related Tickets and Related Meta Tasks sections.
- The Related Tickets section is visible on the task and the Related Meta Task section is visible on the ticket.
- Clicking on the related ticket will open the ticket in a new tab on your browser for easier viewing.
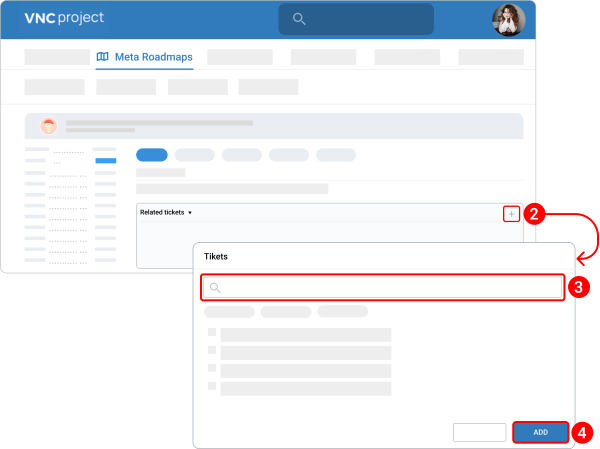
To relate a task and a ticket together, do the following:
- Open a meta task.
- Under the Related tickets section, click the plus icon
 .
. - In the search field, enter the number of the ticket to be related.
- Click Add.
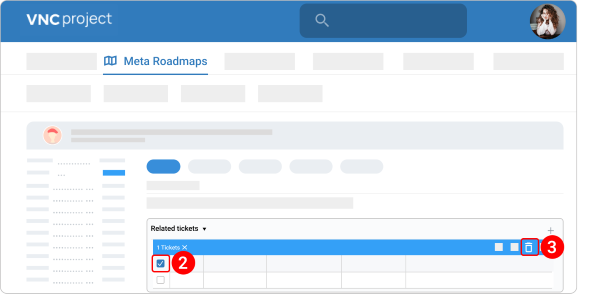
Delete a relation between a task and a ticket
- Open a meta task.
- Under the Related tickets section, check the box next to the related ticket.
- In the upper right corner, click the trash bin icon
 .
.
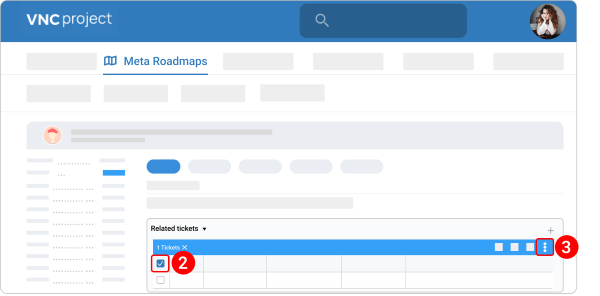
Perform actions on a related ticket
- Open a meta task.
- Under the Related tickets section, check the box next to the related ticket.
-
In the upper right corner, click the kebab menu icon
 to perform the following actions on it:
- Edit a ticket
- Change status, type, priority, target version, assignee, % done, analytic account, and story points.
- Add tags
- Log time
- Copy a ticket
- Delete a ticket
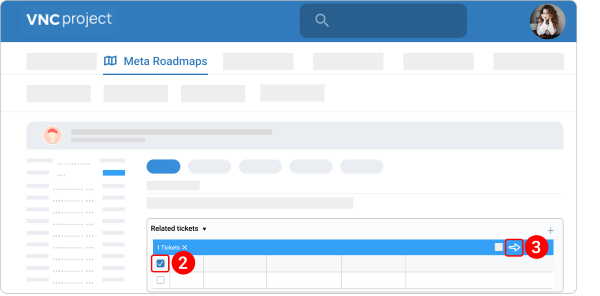
Relate ticket to another meta task
- Open a meta task.
- Under the Related tickets section, check the box next to the related ticket.
- In the upper right corner, click the following icon
 and select a required task.
 - Click Save.
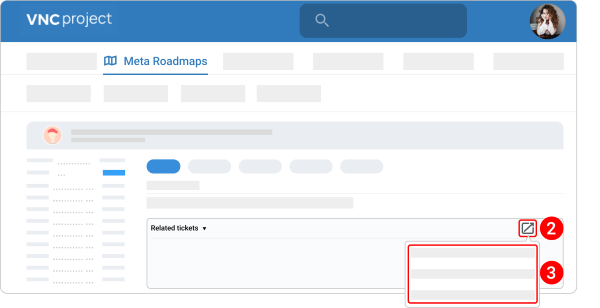
Open all related tickets
You can open all related tickets under the meta task.
- Open a meta task.
- Under the Related tickets section, click the following icon
 .
. -
Select one of the following options:
- Open Agile Board if you want to view all related tickets on Agile Board.
- Open Table if you want to view all related tickets as a table.
- Open Tickets if you want to open each ticket on a separate tab.
Link a project to a meta task
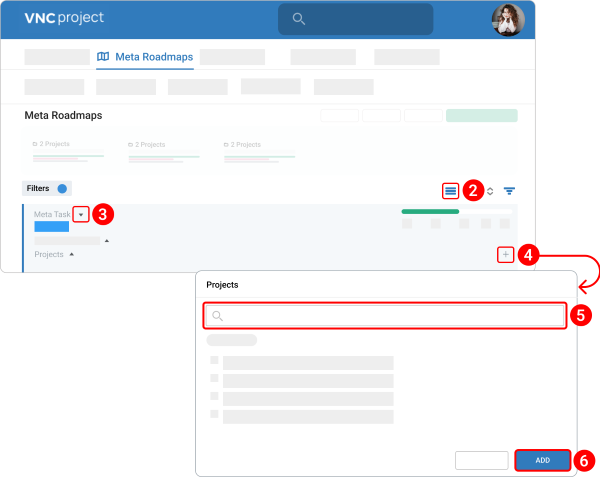
There are 3 ways to link a project to a meta task.
Way 1. From the Meta Roadmap Overview (Compact View).
- Open a meta task.
- Under the Filters and View Settings section, click the compact view icon
 .
. - Click the down arrow
 next to the meta task title.
 - Scroll down to the Projects section and click the plus icon
 in the upper right corner.
 - Select a project you want to link to a meta task.
- Click Add.
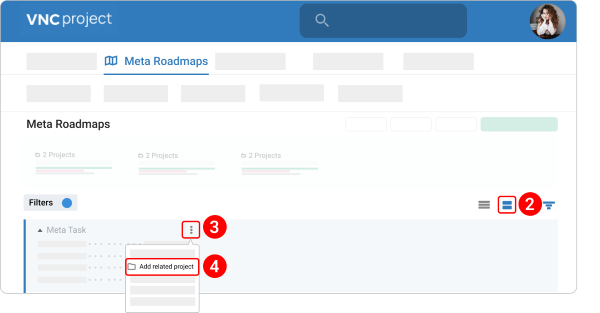
Way 2. From the Meta Roadmap Overview (Detailed View).
- Open a meta roadmap to which you want to edit a meta task.
- Under the Filters and View Settings section, click the detailed view icon
 .
. - Click the kebab menu icon
 next to a meta task title.
 - Select Add related project from the dropdown menu.
- The further steps are the same as for the first way of linking a project to a meta task.
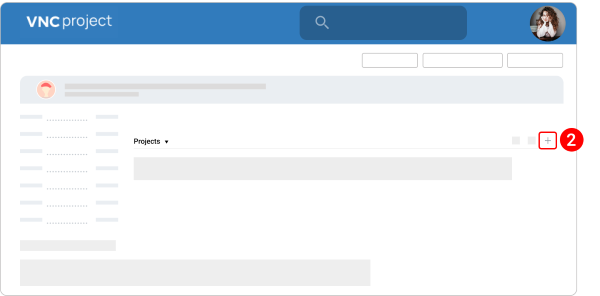
Way 3. From the meta task detail page.
- Open a meta task.
- Scroll down to the Projects section and click the plus icon
 in the upper right corner.
 - The further steps are the same as for the first way of linking a project to a meta task.
Link a target version to a meta task
There are 3 ways to link a target version to a meta task.
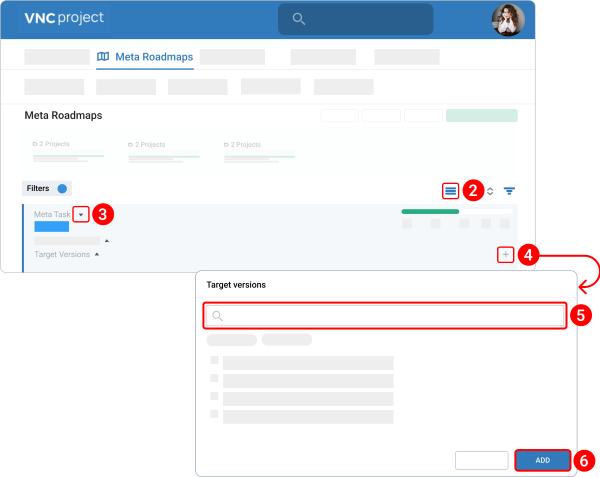
Way 1. From the Meta Roadmap Overview (Compact View).
- Open a meta task.
- Under the Filters and View Settings section, click the compact view icon
 .
. - Click the down arrow
 next to the meta task title.
 - Scroll down to the Target Versions section and click the plus icon
 in the upper right corner.
 - Select a target version you want to link to a meta task.
- Click Add.
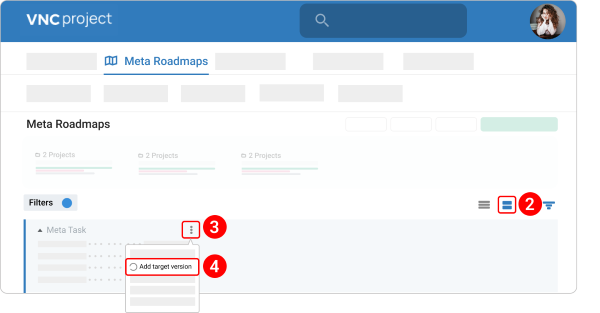
Way 2. From the Meta Roadmap Overview (Detailed View).
- Open a meta roadmap to which you want to edit a meta task.
- Under the Filters and View Settings section, click the detailed view icon
 .
. - Click the kebab menu icon
 next to a meta task title.
 - Select Add target version from the dropdown menu.
- The further steps are the same as for the first way of linking a version to a meta task.
Way 3. From the meta task detail page.
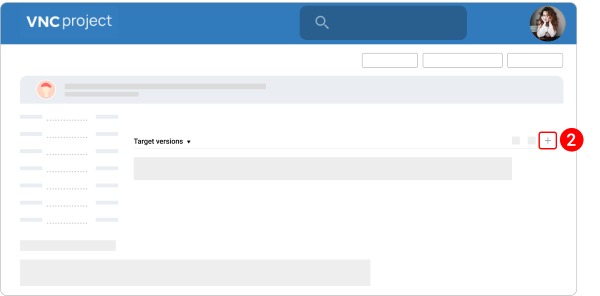
- Open a meta task.
- Scroll down to the Target Versions section and click the plus icon
 in the upper right corner.
 - The further steps are the same as for the first way of linking a version to a meta task.
Edit a meta task
There are 4 ways to edit a meta task.
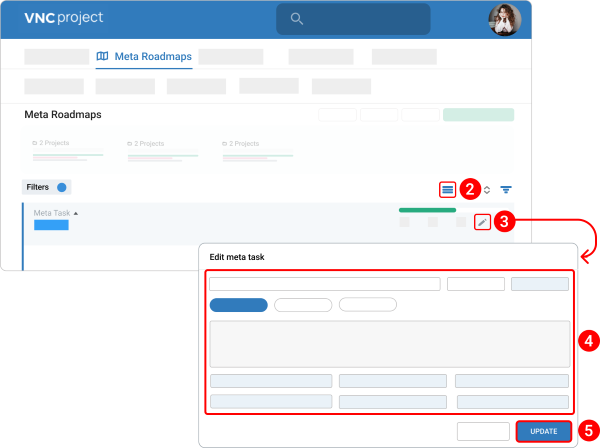
Way 1. From the Meta Roadmap Overview (Compact View).
- Open a meta roadmap to which you want to edit a meta task.
- Under the Filters and View Settings section, click the compact view icon
 .
. - Click the pencil icon
 next to a required meta task.
 - Make your changes.
- Click Update.
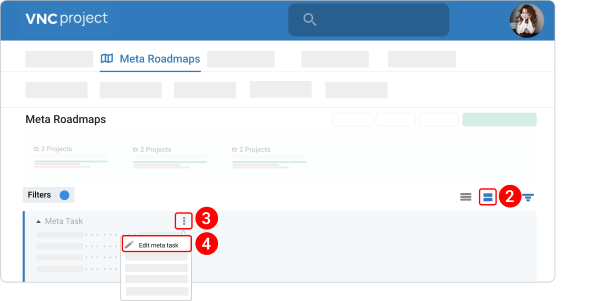
Way 2. From the Meta Roadmap Overview (Detailed View).
- Open a meta roadmap to which you want to edit a meta task.
- Under the Filters and View Settings section, click the detailed view icon
 .
. - Click the kebab menu icon
 next to a meta task title.
 - Select Edit meta task from the dropdown menu.
- The further steps are the same as for the first way of editing a meta task.
You can also change only one attribute in the meta task such as Status, Start/ Due Date, Priority, Task Owner, etc. Click on the field you would like to update. There's also no need to press save when you edit ticket details, as whatever you enter is saved as soon as you click a field.
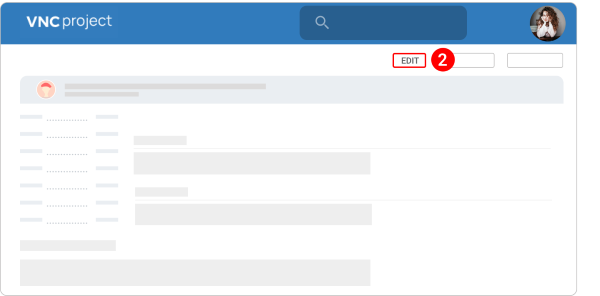
Way 3. From the meta task detail page (by using the "Edit" button).
- Open a meta task.
- In the upper right corner, click the Edit button.
- The further steps are the same as for the first way of editing a meta task.
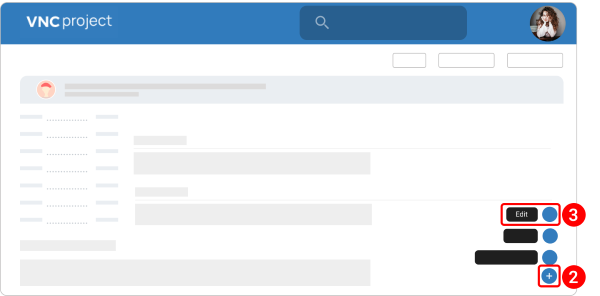
Way 4. From the meta task detail page (by using the plus icon).
- Open a meta task.
- At the bottom, click the plus icon
 .
. - Select Edit.
- The further steps are the same as for the first way of editing a meta task.
Share a meta task
There are 2 ways to edit a meta task.
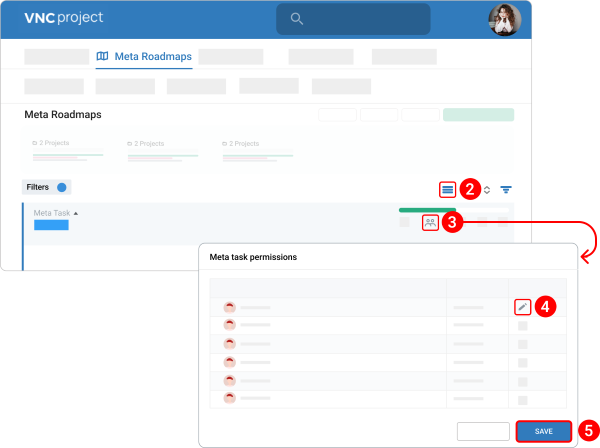
Way 1. From the Meta Roadmap Overview (Compact View).
- Open a meta roadmap to which you want to edit a meta task.
- Under the Filters and View Settings section, click the compact view icon
 .
. - Click the share icon
 next to a required meta task.
 - Click the pencil icon
 next to a required user and select which permissions you want to grant them.
 - Click Save.
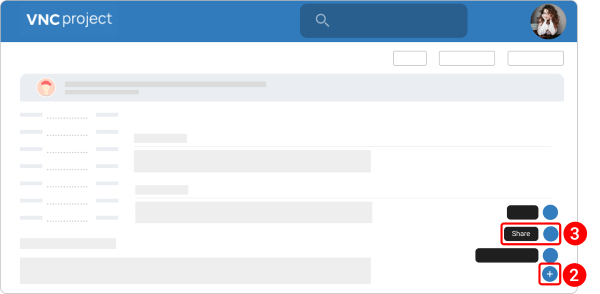
Way 2. From the meta task detail page (by using the plus icon).
- Open a meta task.
- At the bottom, click the plus icon
 .
. - Select Share.
- The further steps are the same as for the first way of sharing a meta task.
Comment on a meta task
You can add comments to a meta task if you want to provide additional information or offer insight.
- A task's comments will appear at the bottom of the left pane.
- Anyone with access to a task will see its comments.
- Several comments can be added to a task.
There are 2 ways to comment on a meta task.
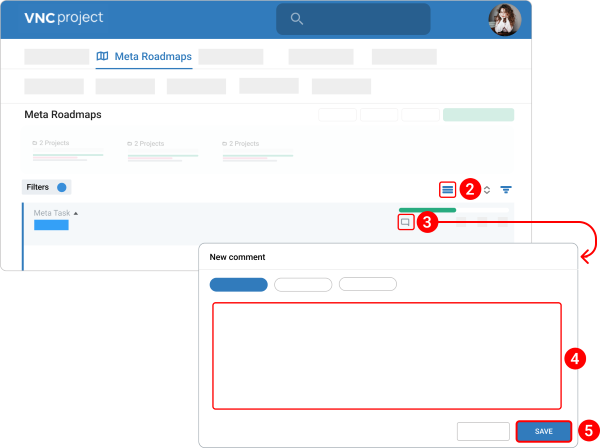
Way 1. From the Meta Roadmap Overview (Compact View).
- Open a meta roadmap to which you want to edit a meta task.
- Under the Filters and View Settings section, click the compact view icon
 .
. - Click the comment icon
 next to a required meta task.
 - Type your comment.
- Click Save.
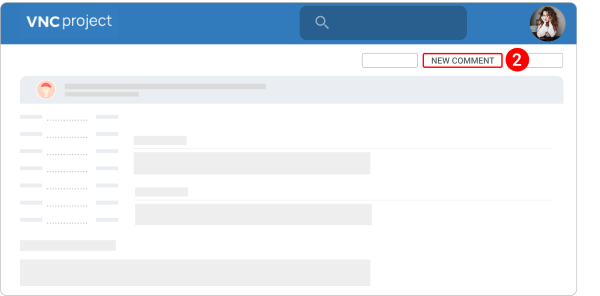
Way 2. From the meta task detail page (by using the "Edit" button).
- Open a meta task.
- In the upper right corner, click the Comment button.
- The further steps are the same as for the first way of editing a meta task.
Mention your teammates
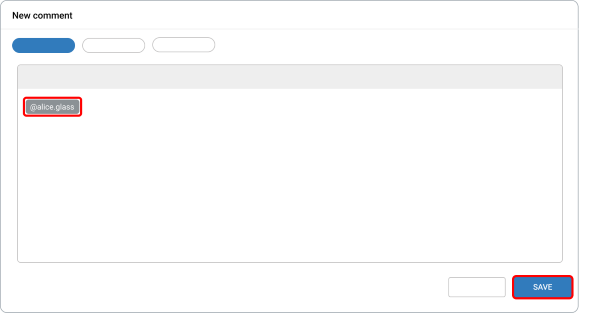
If you need someone to know about a comment, you can mention them in it. Type @ followed by their name, then choose the right person from the list. The person you mention will be notified about your comment and can quickly jump to the task to see what's happening.
Edit a comment
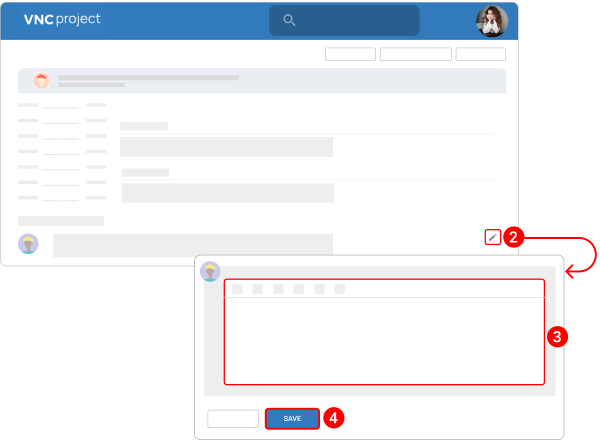
You can edit an existing comment you wrote on a ticket.
- In the upper right corner of the comment you want to edit, click the pencil icon
 .
. - Make your changes.
- Click Save.
Attach a meta task to another roadmap
There are 2 ways to attach a meta task to another roadmap.
Way 1. From the Meta Roadmap Overview (Compact View).
- Open a roadmap where a required task is.
- Under the Filters and View Settings section, click the compact view icon
 .
. - Click the following icon
 next to a required meta task.
 - Select a roadmap to which you want to attach a meta task.
- Click Save.
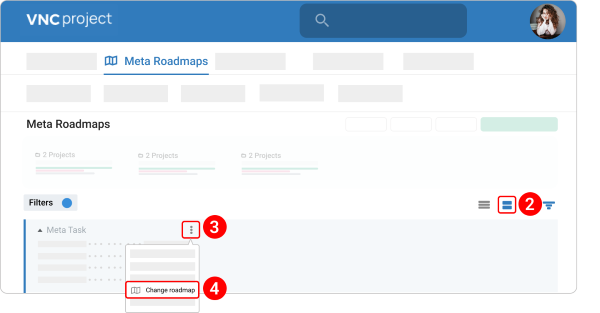
Way 2. From the Meta Roadmap Overview (Detailed View).
- Open a roadmap where a required task is.
- Under the Filters and View Settings section, click the detailed view icon
 .
. - Click the kebab menu icon
 next to a meta task title.
 - Select Change Roadmap from the dropdown menu.
- The further steps are the same as for the first way of attaching a meta task to another roadmap.
Delete a meta task
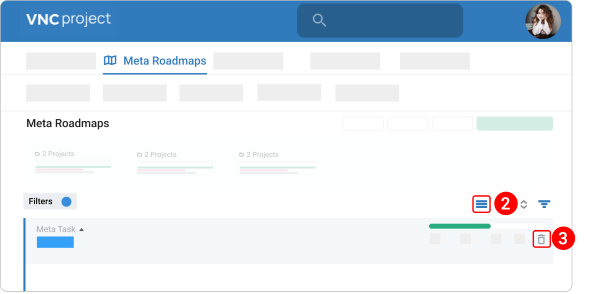
There are 3 ways to delete a meta task.
Way 1. From the Meta Roadmap Overview (Compact View).
- Open a required meta roadmap.
- Under the Filters and View Settings section, click the compact view icon
 .
. - Click the trash bin icon
 next to a required meta task.
 - Confirm that you want to delete the meta roadmap, click YES in the modal window.
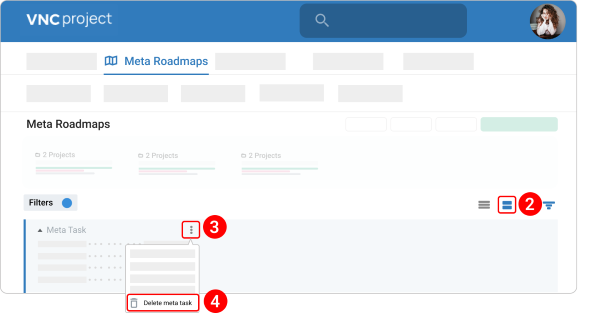
Way 2. From the Meta Roadmap Overview (Detailed View).
- Open a required meta roadmap.
- Under the Filters and View Settings section, click the detailed view icon
 .
. - Click the kebab menu icon
 next to a meta task title.
 - Select Delete Meta Task from the dropdown menu.
- The further steps are the same as for the first way of deleting a meta task.
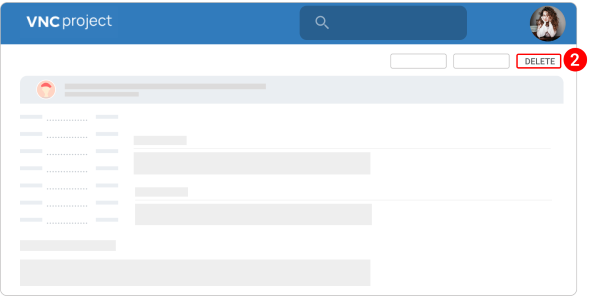
Way 3. From the meta task detail page (by using the "Edit" button).
- Open a meta task.
- In the upper right corner, click the Delete button.
- The further steps are the same as for the first way of deleting a meta task.
Way 4. From the meta task detail page (by using the plus icon).
