VNCsafe User Manual
Getting started
Log in
- Navigate using your web-browser to the URL provided by your administrator.
- Enter your credentials to the respective fields.
- Click LOGIN.
After you have logged in, you are taken to the homepage of VNCsafe, which consists of the following sections:
- Apps Selection Menu: Located in the upper left corner, click the hamburger menu icon to reveal the menu. that lets you access various apps, available for your account.
- Left Navigation Bar: Here you can quickly filter your file browser for shares, favorites or even deleted files.
- Application View: The main central section in the VNCsafe user interface, the file browser. You can browse through your stored and shared files and folders as well as files and folders shared to you by others and perform operations on them.
- Search: Click the magnifier icon in the upper right corner to search for files.
- Settings Menu: The personal menu guides you to your settings and the help functions. The dropdown menu also provides you an option to log out of VNCsafe.
Adjust personal settings
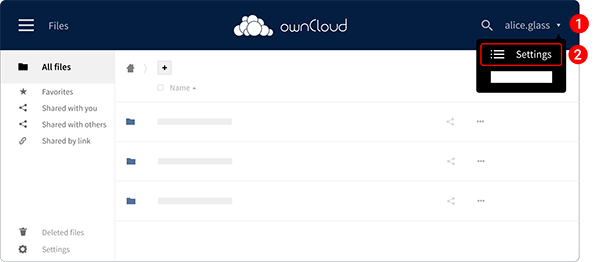
You can change your personal information and account settings, like profile picture, full name, email address, password, language, etc. in the general section of the settings menu:
- In the top right corner, click on your username.
- Select Settings from the opening dropdown menu.
- Make your changes.
Switch between file and gallery view
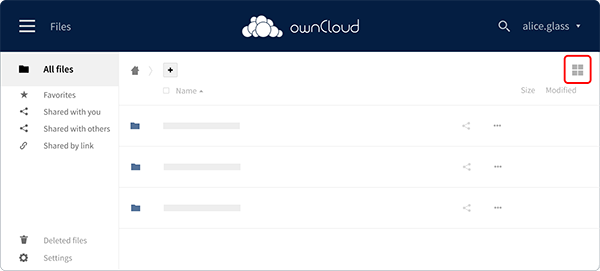
Once you are logged into VNCsafe, you can switch between File and Gallery view with just one click.
To turn on the gallery view, click on the gallery view icon
 in the top right corner.
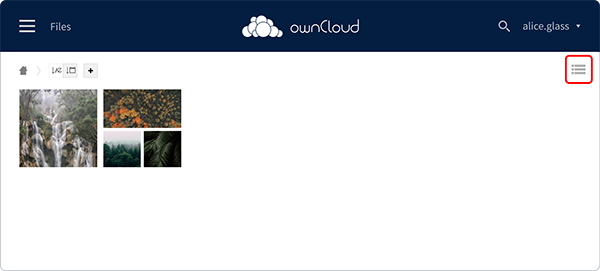
This will take you to the gallery view mode.
If you want to switch back to file view mode, click on the file view icon
![]() in the upper right corner.
in the upper right corner.
The file view displays folders and files as a list, while the gallery view displays a tiled preview.
Log out
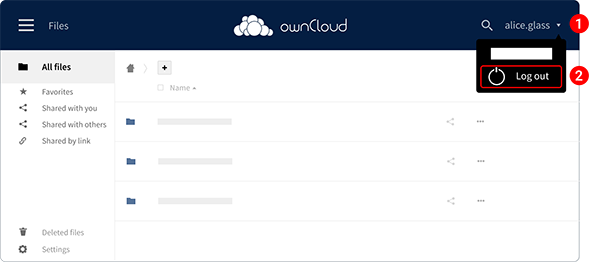
- In the top right corner, click your username.
- Select Logout from the opening dropdown menu.
Settings
To manage your settings, navigate to the settings page:
- In the top right corner, click your username.
-
Select Settings. You will be redirected to the Settings page. In the Personal left menu navigation, you will see the following chapters:
- General
- Storage
- Sharing
- Security
General settings
In general settings, you can:
- Edit your full name
- Manage your profile photo
- Change email address
- Choose the language
- Customize your notifications and Activity stream
- List your group memberships
- Check the ownCloud version
- Determine the default folder to save new documents to, etc.
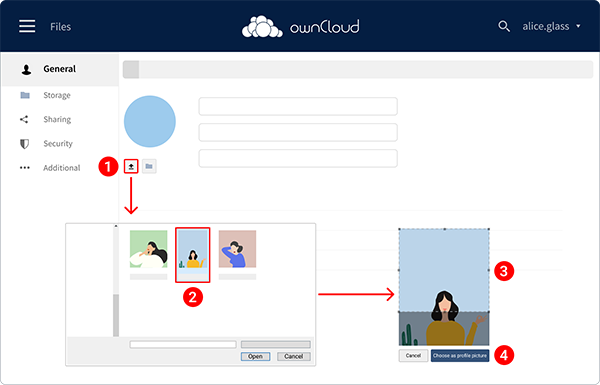
Upload/ Select/ Delete a profile picture
The image can be a maximum of 20MB in size.
- Click Upload new
 button.
 - From the opening file browser of your operating system, choose an image you want to upload.
- Crop the uploaded image, if required.
- Click Choose as profile picture to apply the new image to your profile.
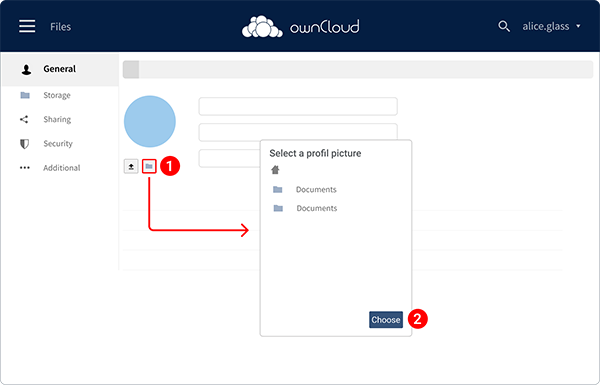
You can also select a profile picture from your files on VNCsafe. To do that:
- Click the Select from Files
 button.
 - In the opening image browser, pick the profile picture you want and click Choose to apply.
To delete your profile picture, click the Remove image  button.
After that, the image will revert to the default placeholder avatar, presented to you after your first login.
Update your full name
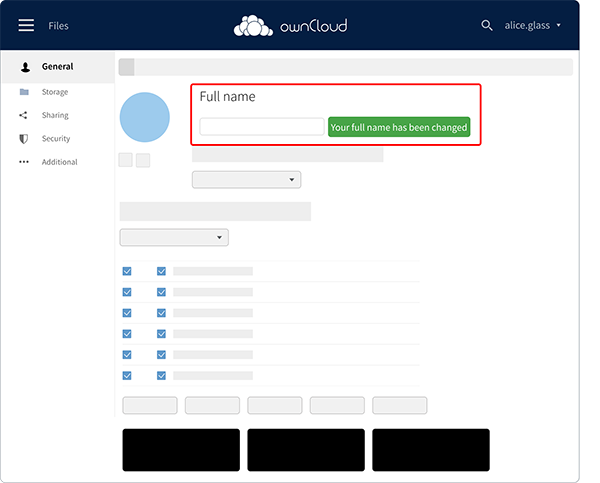
To update (or edit) your full name, amend the existing text in the Full name box. After a few seconds, you'll see the notification stating that
Your full name has been changed.
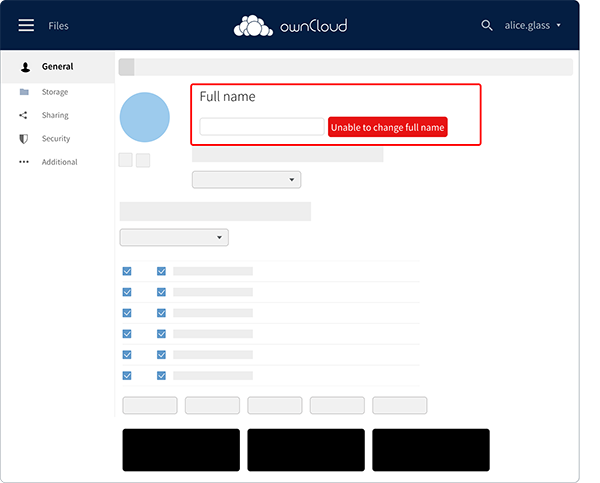
If the full name cannot be changed, you will see the notification stating
Unable to change full name.
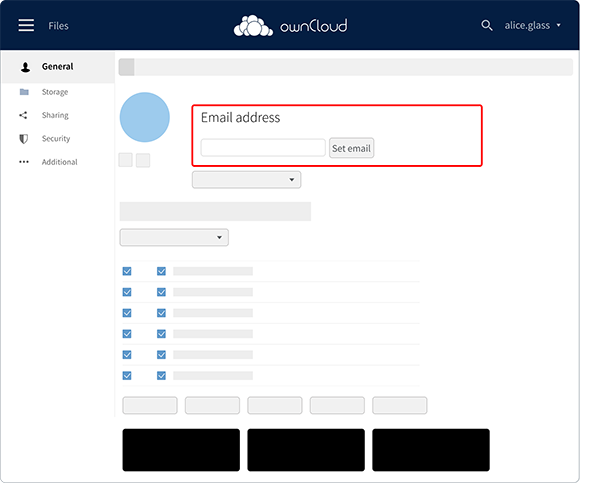
Update email address
To update your email address.
- In the Email box, change the existing email address.
- Click the Set email button.
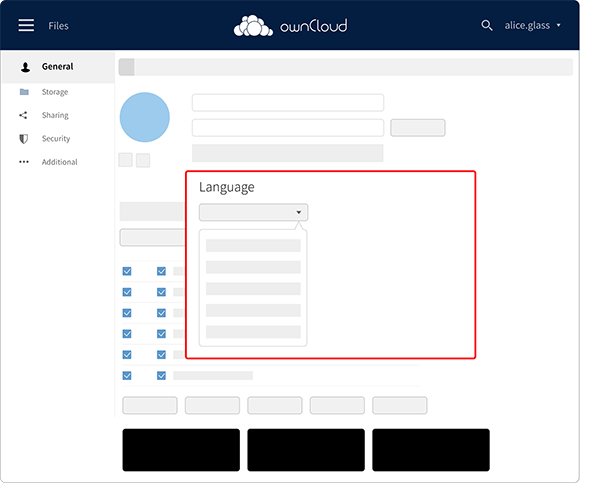
Choose the language
To change the language for your user account:
- Under the Language drop-down menu, select your preferred language from the list of available options.
- The new language will be auto-saved shortly after you selected it.
Storage
If your ownCloud administrator has enabled External Storage for users, you will be able to add one or multiple external storages, depending on the allowed storage types.
Sharing
This section allows you to configure whether or not, you want to:
- Automatically accept new incoming local user shares
- Allow finding you via autocomplete in the share dialog
To enable either, check the respective checkbox.
Security
The security settings page allows you to:
- Manage CORS white-listed domains
- View user sessions
- Create new app passcodes to allow 3rd party applications access to your VNCsafe account.
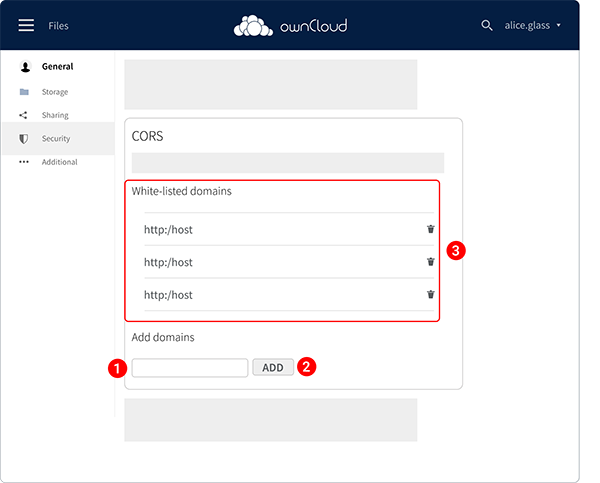
Manage CORS white-listed domains
You have the option to whitelist certain domains. This gives you the ability to access your VNCsafe through other domains.
By default, no domains will be listed. To add one, or more:
CORS entries follow strict rules, only HTTP and HTTPS protocols are allowed.
- In the Domain field, enter a domain name you want to add.
- Click Add.
- You will then see them listed.
To remove a domain name:
- Click the trash bin icon
 next to the required domain name.
 - When prompted, click Yes to confirm that you want to delete the domain name.
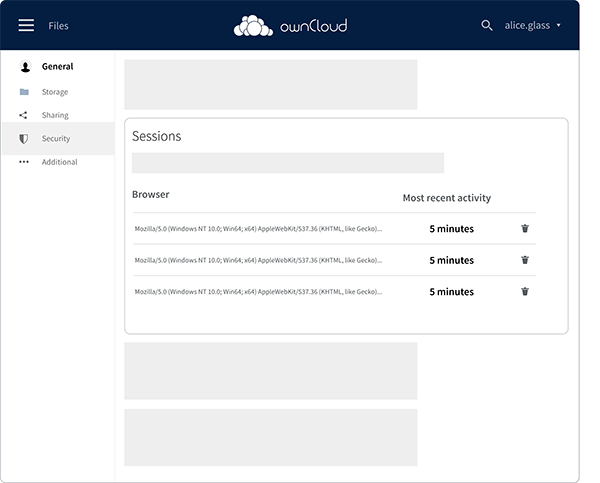
View user sessions
The sessions section represents a list of all your current user sessions across web, desktop, and mobile clients. Specifically, it lists the used browser's user agent string and the time of the most recent activity.
Add passwords/ tokens
This section allows you to provide permission for an app or device to access your VNCsafe account. App passwords are a security measure that lets you keep your actual password hidden from 3rd party applications.
To add a password:
- In the App name field, insert the app name.
- Click Create new app passcode.
- A username and password/token will be generated and the app will be listed in the apps list in this section.
If you want to revoke access to a device or app, click the trash bin icon  next to its name in the apps list.
Using VNCsafe
File controls
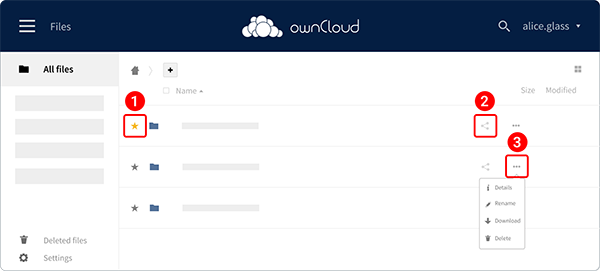
In the Files view or file browser, there are three clickable options available for every file or folder:
- Mark a file/ folder as favorite (1);
- Share a file or folder (2);
- Additional options menu (3).
Mark a file as favorite
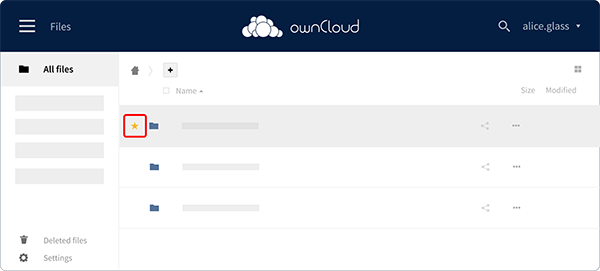
The starred files feature allows you to bookmark specific files so you can quickly refer back to them later.
- Hover the pointer over the file's row. Click the star to the left of the file icon.
- The star will turn yellow, confirming that you've marked the file as your favorite.
You can quickly find all of your favorites with the Favorites filter on the left sidebar.
Share files and folders
The sharing files control is a shortcut to the file and folder sharing functionality within VNCsafe. VNCsafe sharing supports:
- Sharing with single users or groups
- Sharing via link
Share with single users or groups
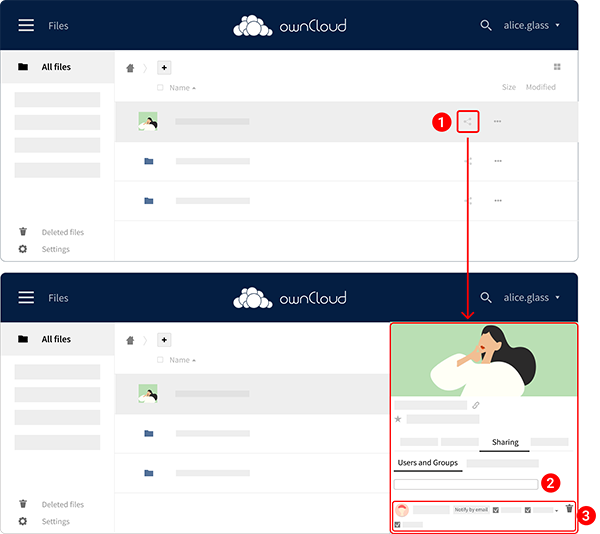
- Click the share button
 in the file menu.
 - The share option menu for this file or folder opens on the right side, providing options to share the file or folder to individual users and groups. Start entering the user- or groupname in the input field to get the target user or group displayed for selection.
-
Set specific permissions for each person or group:
- can share: The user/ group can re-share the object with other users or groups;
- can edit: The user/ group can add comments and tags and edit the object (e.g., text files);
- can change: The user/ group can edit the shared object and replace it with a newer version.
- By clicking on the trash icon
 you revoke all rights for the user or the group.
Share via link
You can also share a file or folder by making it accessible via link. To do this:
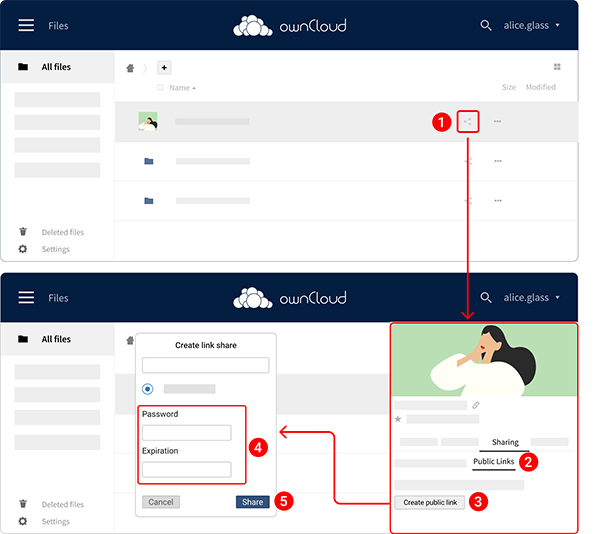
- Click the share button
 in the file menu.
 - The share option menu for this file or folder opens on the right side, providing the options to share the file or folder with individual users and groups. Click the Public Links tab.
- Click the Create Public Link button.
- Set a password and expiration date for your link. (optional)
- Click Share.
Now you have created the link to the shared file or folder and have these additional options:
- Copy to clipboard: You can then paste the copied link from the clipboard, e.g. into emails or chat messages to provide others access to the shared resource.
- Edit: Here you can change the expiration date and the password for the link.
- Share: With this button you can share the link on various social media.
- Delete: Here you can delete the link completely, The shared resource will then be no longer available to others via the provided link.
Manage a file
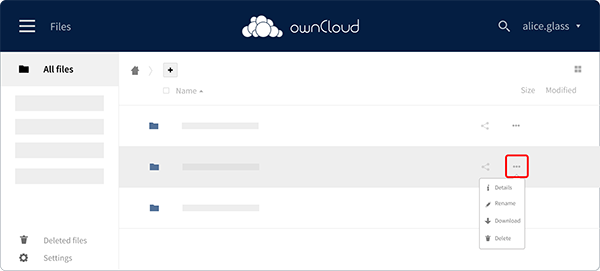
By clicking the additional options menu icon, you can:
- View File Details
- Rename Files
- Download Files
- Delete Files
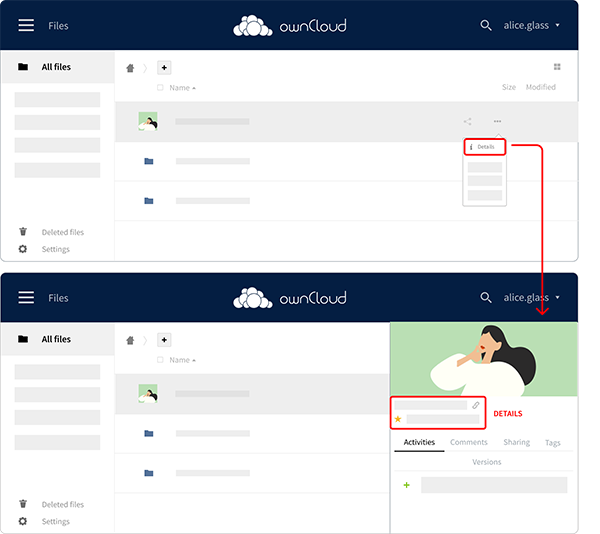
View file details
Clicking Details in the Additional Options Menu, a set of tabs (or views) become available to you in the opening pane on the right side. These are:
- Details: This shows details about the selected file or folder, such as its name, size, and when it was created or last updated.
- Activities: This tab lists the activity history of the selected file or folder in chronologic order, eg. as when it was created, updated and shared.
- Comments: Here you can add new comments and read existing comments on the selected file or folder.
- Sharing: Opens the share menu described in section "Share files and folders".
- Tags: Here you can assign one or more tags to files and folders. For more information, refer to the "Tags" section.
- Versions: This tab lists a history of all the versions of the file and allows you to download the file in a previous version state or roll back to a previous version of the file. This is not available for folders.
Rename a file or folder
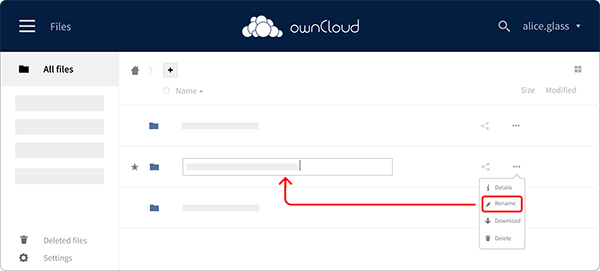
You have an option to rename a file/ folder.
- Click the additional menu icon and then select Rename.
- The file’s current name will be displayed in an editable text box. Change the name, hit Enter, then the file will be renamed.
If you do not want to rename it, hit Esc and the file name will remain unchanged.
Download a file or folder
You can download a single file/ folder or multiple files/ folders at once.
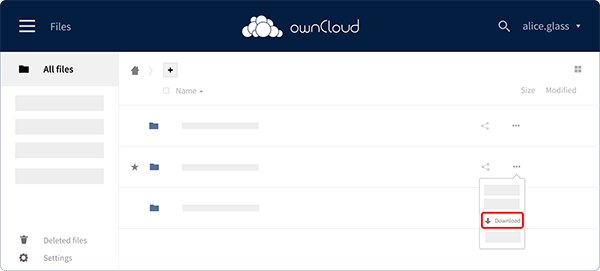
To download a single file or folder:
- Click the additional menu icon and then select Download.
- The selected file is saved to the selected download location on your device. In case of a folder, the folder and its content, including subfolders, is downloaded as a zip-file to the selected download location on your device.
To download multiple files at once:
-
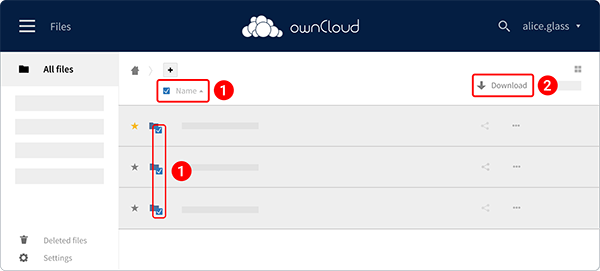
Hover the pointer over the file's row to see a checkbox appearing.
- To select all files in the current directory, click on the checkbox located at the top of the file listing.
-
If you select multiple files, click the Download button appearing in the top right corner. The selected files and folders are downloaded as a zip-file to the selected download location on your device.
Delete a file
No confirmation to remove is requested. Once you click the trash bin icon, the object will be deleted.
You can delete a single file or multiple files at once.
To delete a single file or folder:
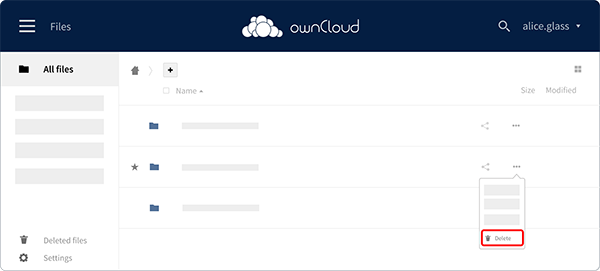
- Click the additional menu icon and then select Delete.
- The file or folder will be deleted immediately.
To delete multiple files at once:
-
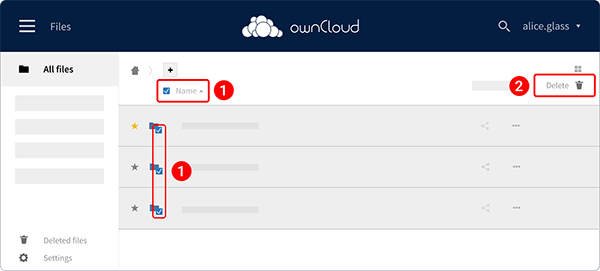
Hover the pointer over the file's row to see a checkbox.
- To select all files in the current directory, click on the checkbox located at the top of the files listing.
-
If you select multiple files, click the Delete button appearing in the top right corner. The selected files and folders will be deleted immediately.
Restore previously deleted files and folders
You have an option to restore previously deleted files and folders to your account.
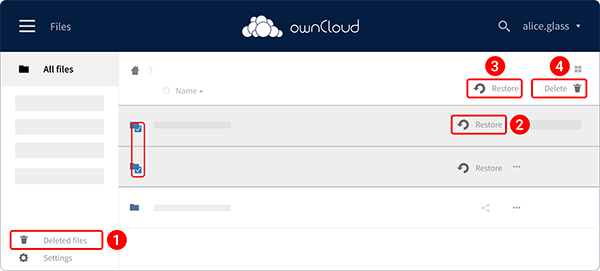
- Click the Deleted files button at the bottom left.
- To restore a single file or folder, click Restore on the file.
- To restore multiple files or folders, check the box of each object you want to restore, and then click Restore in the top right corner.
- If you click Delete, the objects are removed from the "Recycle Bin" and permanently deleted.
The restored items will appear in the location of your file structure, where they were once deleted.
Creating and managing objects
Filter the files view
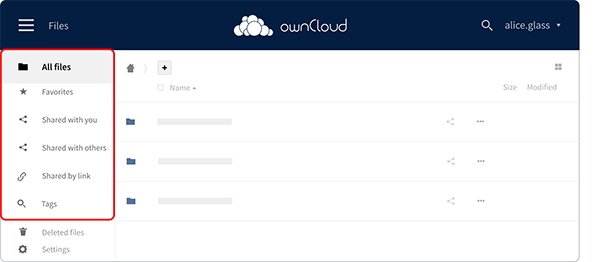
The the left sidebar of the Files view contains several filters for quickly sorting and managing your files.
- All files: The default selection shows all stored files and folders, starting with the top-level directory.
- Favorites: In this category you will find files or folders marked as favorites.
- Shared with you: In this category you will find all the folders and files that others have shared with you.
- Shared with others: All the content you have shared directly with other users or groups is listed here. At the end of each line, you can see whom you shared the object with.
- Shared by link: In this menu you can see which files you have shared as a link.
- Tags: You can label each file and folder using "Tags". The search bar for the tags shows you all the tags you or other users have created for selection as you type. Once a tag as been chosen, from the results list, all the files and folders that have been marked with the appropriate tag and for which you have the required access rights, are listed.
Create a folder/ text file
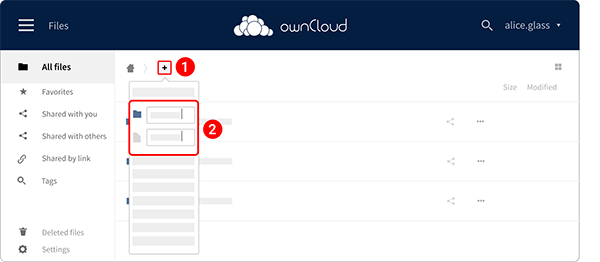
At the top of the Files view is a navigation bar. This contains a menu for uploading and creating new files and folders.
-
Click the + button in the files view and select the respective option:
- Folder, If you want to create a new folder in the current directory.
- Text file, if you want to create a new text file and add the file to the current directory.
-
Enter the folder's/ text file's name and press Enter.
The folder/ text file will be created in the current directory.
- If you open another folder before creating the new folder, you can create subfolders.
- You can also move files and folders via drag and drop to subfolders of the current directory or to the desired upper level by dropping them at the respective directory in the navigation bar.
Upload a file
- Click the + button and select Upload from the opening menu.
- The file browser dialog opens and you can select the files that you want to upload to your VNCsafe account.
- Select the files you want tu upload and then click Open.
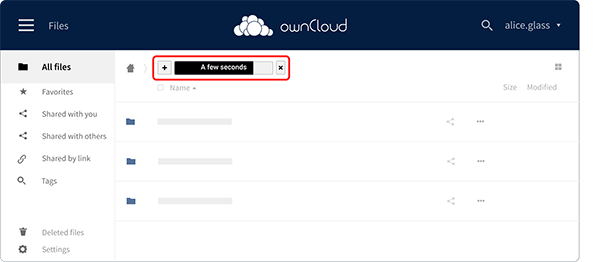
- While the files are uploaded, a status bar shows the remaining time for the upload. You can cancel the upload by clicking on the X button next to the status bar.
Open a media file
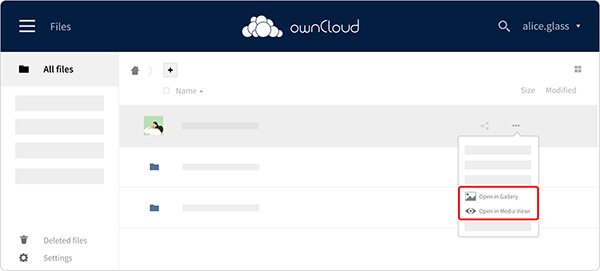
There are two ways to open a media file:
- In the Media Viewer
- In the Gallery
Open a file in Media Viewer
The Media Viewer App is a simple viewer for pictures and videos.
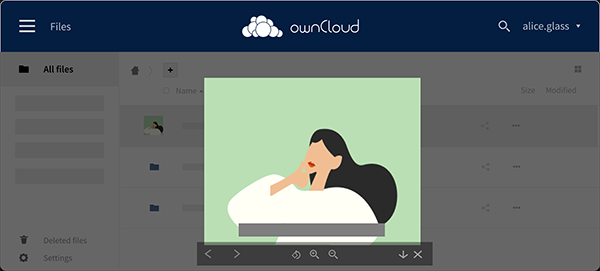
If you open an image in the Media Viewer, you have several ways to interact with it:
- The arrow buttons right
 and left
  allow you to navigate to the next and previous image.
 - Click the cross button
 to close the full-screen view.
 - The magnifier button with the plus sign in it
 allows you to enlarge the image size.
 - The magnifier button with the minus sign in it
 allows you to minimize the image size.
 - The download button
 enables you to download the opened image.
 - Use the circle button
 to rotate the image clockwise.
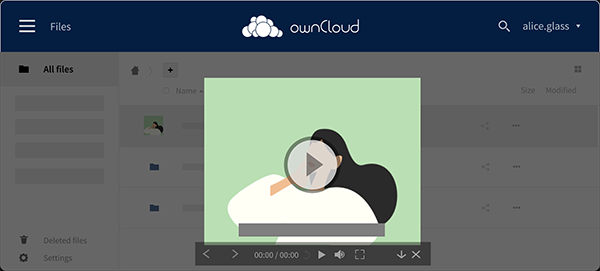
If you open a video in the Media Viewer, you have several ways to interact with it:
- The arrow buttons right
 and left
  allow you to navigate to the next and previous images/ videos.
 - The play button
 allows you to watch a video file.
 - The replay button
 enables the video file to play on repeat.
 - The sound button
 allows you to adjust the volume of the video file.
 - The full-screen button
 allows you to extend the video to full screen. To go back to windowed display, click on
  .
. - The download button
 enables you to download the opened video file.
Open in a Gallery
If you open an image in the Gallery, you have the following ways to interact with it:
- The arrow buttons right
 and left
  allow you to navigate to the next and previous images.
 - With the play button
 at the bottom right, the pictures change automatically after a few seconds.
 - With the cross button
 in the upper right corner, you close the full-screen view.
 - The trash bin button
 in the top right corner enables you to delete the opened file.
 - Use the circle button
 to rotate the image clockwise.
Tags
You can label each file and folder, using tags. These are keywords with which objects from different folders can be displayed together, when searching for them.
- The search bar for the tags shows you all the tags you or other users have created for selection as you type.
- Once a tag as been chosen, from the results list, all the files and folders that have been marked with the appropriate tag and for which you have the required access rights, are listed.
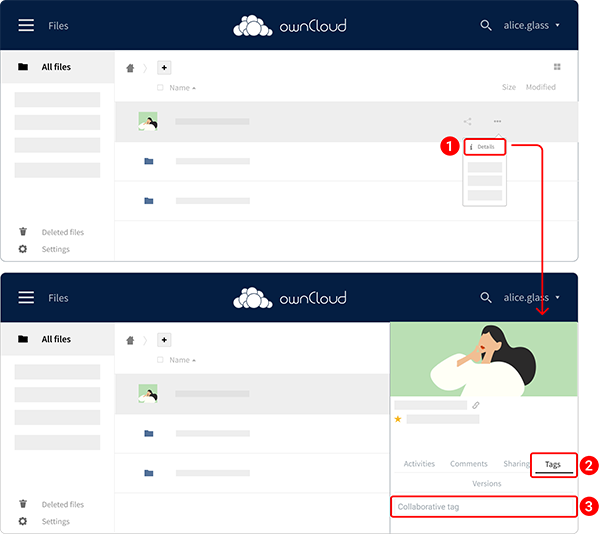
Tag a file
You can tag files and folders to make them easier to find. To add one or more tags to the files and folders:
- Click the additional menu icon on the file's row and select Details.
- Click the Tags tab.
- In the Collaborative tags text field, type the tag’s name. You can use as many words as you want for the tag name.
- Press Enter. The tag will be saved.
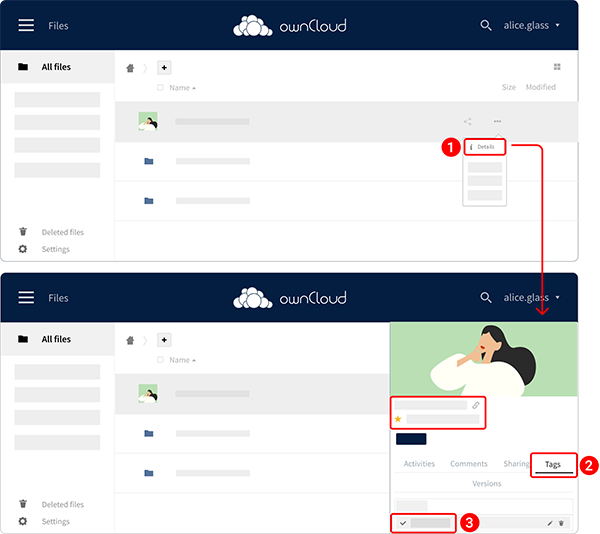
Untag a file/ folder
- Click the additional menu icon on the file's row and select Details.
- Click the Tags tab. You'll see the text field with tags assigned.
- Click the field. The drop-down list with the tags assigned will open.
- Click the tag's name. You will see that the check mark disappears.
Edit a tag
Be sure that you want to edit the tag’s name before doing it, since it will be updated for all users.
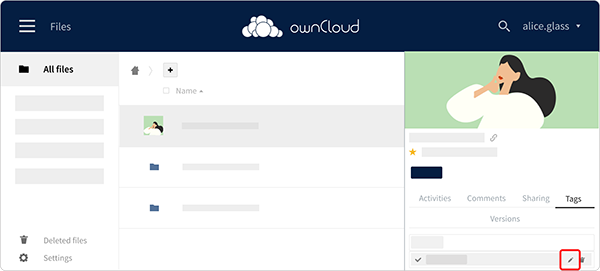
In the drop-down list, click the pencil icon on the right side of the tag’s name you want to edit. This will display a text box containing the tag’s name.
Delete a tag
Deleting a tag removes it for all users. So be sure that you want to do this.
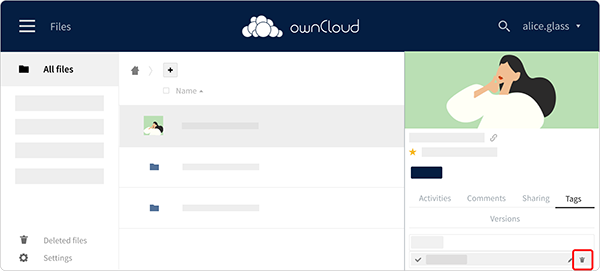
In the drop-down list, click the trash bin icon on the far right side of the tag you want to remove.
Activity
VNCsafe provides an overview page that displays your recent account actvitiy in chronologic order, listing operations (delete, create, upload, share) that happen to files and folders in your account. In the General Settings menu, users can specify which file and folder actions should be listed in the comprehensive activity stream and for which file and folder actions eMail-notifications should be triggered additionally.
View Activity stream
View the Activity Stream:
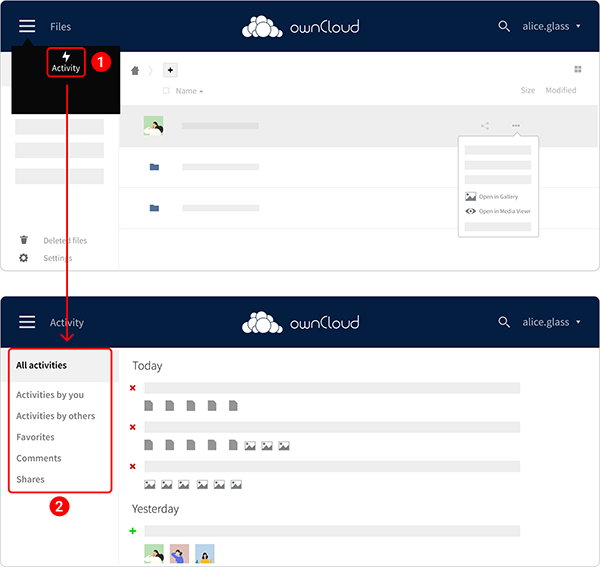
- In the upper left corner, open the hamburger menu and then select Activity. You will see all actions that happen to files and folders you have access to.
-
On the left sidebar, you can filter activity by:
- Activities by you
- Activities by others
- Favorites
- Comments
- Shares
Configure Activity preferences
You can not only get a comprehensive overview of all file and folder events happening in your VNCsafe account but also receive notifications for such via eMail.
You can customize your individual Activity preferences in your settings and can decide in detail, which file or folder actions should be listed in the Activity stream and also for which file or folder actions you want to be notified per eMail.
You can also determine how often the system should send you a report about your file actions.
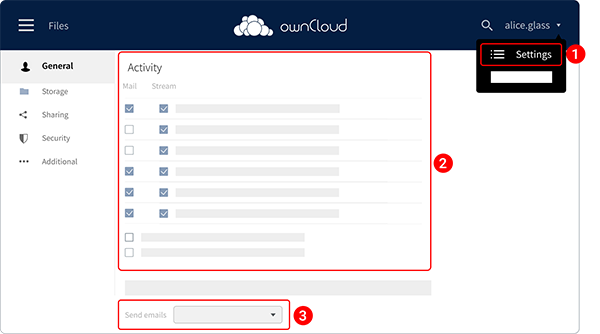
- Navigate to Settings > General.
-
In the Activity section, you can customize notifications settings when:
- Files and folders are created, changed, deleted, restored (from the trash bin) or shared.
- Files and folders are shared from another server.
- A publicly shared file or folder was downloaded.
- Comments are added to a file.
- System tags for a file have been modified.
-
From the Send emails drop-down, select how often you want to receive a report about your file actions.
Limit notifications
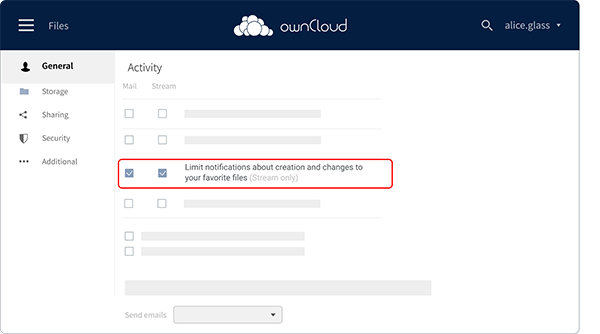
You can also limit the Activity stream to "Favorites".
To do that, check the box next to Limit notifications about creation and changes to your favorite files.
VNCoffice (Collabora Online)
VNCoffice allows you to open all kinds of office documents directly in your browser.
- Support for all major document, spreadsheet, and presentation file formats.
- You can create new content, share your work and work on a shared document collaboratively in the browser.
- The other users working on the same shared document see changes to the document happening in real-time.
Open office documents in VNCoffice
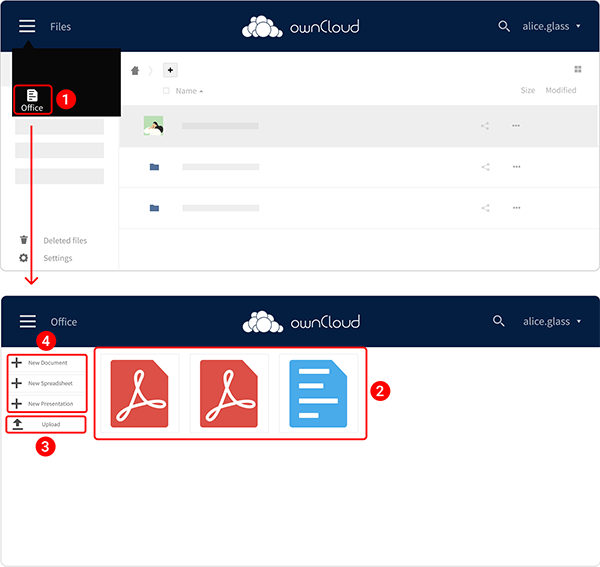
- In the upper left corner, open the hamburger menu and then select Office.
- From here, open any document from the list of documents recently used.
- Click the Upload button to upload a file from your computer.
- To create a new document, spreadsheet or presentation, click the respective button.
Bookmarks
VNCsafe gives the users an option to remember their favorite and frequently visited websites.
Add a bookmark
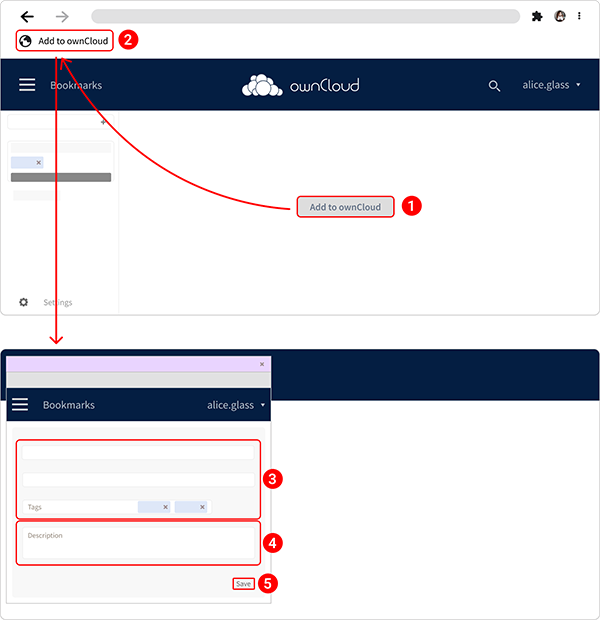
- Drag the Add to ownCloud button, displayed in the bookmarks window, to the bookmarks bar of your browser. Your browser should indicate when you are in the correct place (a separator line appeared).
- The button should stay/stick in your browser and will be available there all the time.
- When you are browsing the web and find a page that is important, you can click the Add to ownCloud button. The modal dialog will open to help you save the bookmark to your VNCsafe account's bookmark list.
- The page name and web address will be recorded automatically. Enter some tags by typing in the box and hitting enter at the end of each tag (at which point they turn blue).
- You can also include a description.
- Click Save.
Your bookmark and any new tags you used, will appear in your VNCsafe instance (you may have to refresh the page).
You can also use the search bar of VNCsafe in the top right of your screen to find saved bookmarks.
Delete a bookmark
After you delete a bookmark, you cannot get it back.
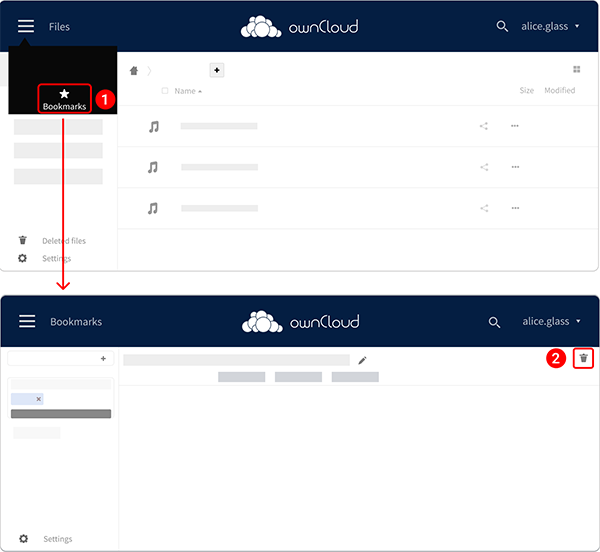
- In the upper left corner, open the hamburger menu and then select Bookmarks. In the Bookmarks window, you'll see the list of bookmarks.
- Hover the pointer pointer over the bookmark you want to delete. Click the trash bin button
 that appears.
 - Confirm that you want to remove the bookmark - click Yes in the modal dialog.
Edit a bookmark
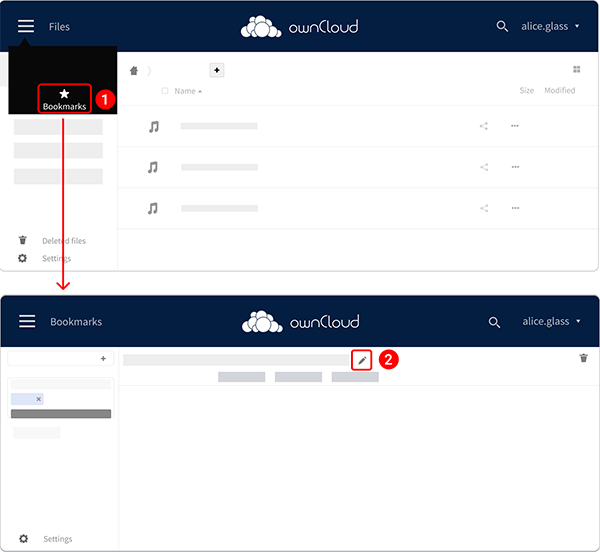
- In the upper left corner, open the hamburger menu and then select Bookmarks. In the Bookmarks window, you'll see the list of bookmarks.
- Hover the pointer over the bookmark you want to edit.
Click the pencil icon
 that appears.
Organize your bookmarks
To help you find the bookmark easily next time you need it, you can use tags. While adding a page to bookmarks, add tags to it, that will save you time looking for your links later.
To filter bookmarks using tags, click tag by which you want to filter your results.
- The number you see next to the tag, displays the amount of bookmarks currently tagged with it.
- You can also edit and delete your tags. To do that, hover the pointer over the tag you want to edit/delete and click the respective icon that appears.
Music
The Music window is divided into three main sections:
- The navigation sidebar on the left hosts the various category filters and the settings at the lower edge.
- The main view displays the audio files dependent on the navigation selection and the player bar containing the controls on top.
- The hideable sidebar on the right hosts cover art of tracks/playlists and General and Technical tabs.
Navigation
- Albums
- Folders
- Genres
- All tracks
- Internet radio
- Podcasts
- Standard Playlists.
Sidebar (on the right)
To open the sidebar with additional information and actions about a track, hover the mouse pointer over the line of the corresponding track in the playlist and click
 .
.
The sidebar with the cover art and the tabs opens on the right side.
The following tags are listed on the General tab:
- Title
- Artist
- Album
- Albom artist
- Track number
- Year
- Genre
- Disc
- Length
The following tags are listed on the Technical tab:
- Form
- Channels
- Sample rate
- Bitrate
- Channel mode
- Bitrate mode
- Codec
- Encoder
- Lossless
Play Audio Files
Supported Audio Formats:
- FLAC
- MP3
- MP4
- Ogg Vorbis
- Opus
- Waveform Audio
Supported Playlist Formats:
- M3U
- PLS
Add a track
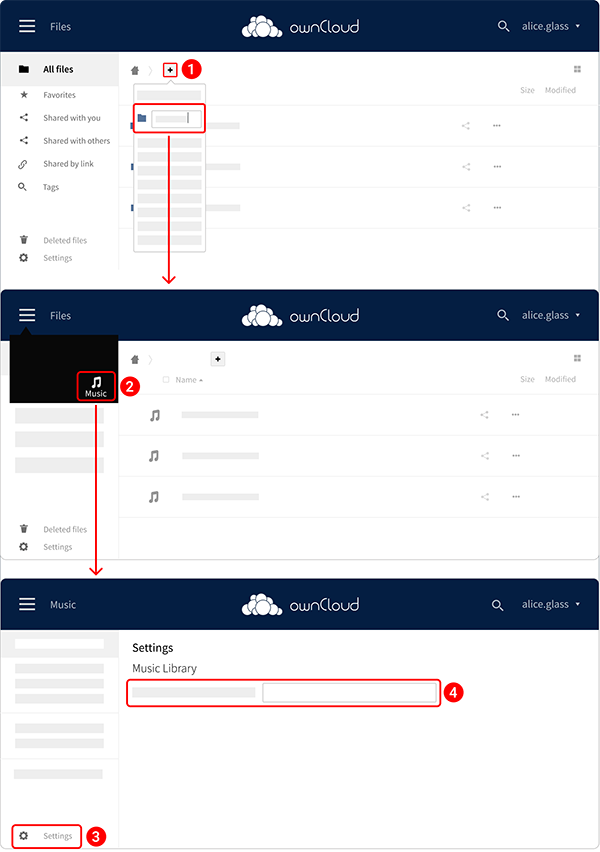
- Click the "+" icon in the *files view to create a folder where you want to store your songs.
- Choose songs and put them in the folder you've created. Then, in the upper left corner, open the hamburger menu and select Music.
- Go to Settings and enter the path to your music.
- Go to All tracks and scan for music.
Here you play songs and in the opening player bar change volume, shuffle songs and repeat them.
Create, edit or delete a playlist
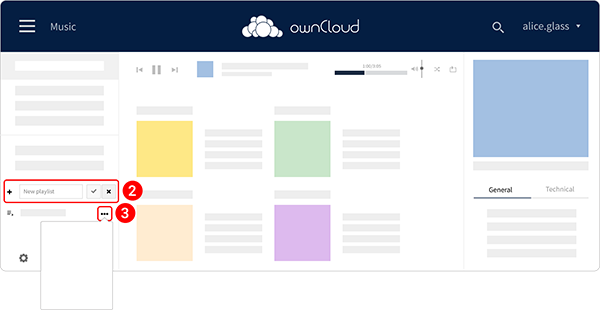
- Open the Music app via hamburger menu.
- On the navigation side bar, click the "+" button to create a new playlist. Enter the desired name and finish the creation by clicking the checkmark or hit ENTER.
- When you hover the pointer over a playlist, the additional menu icon
 right to its name, allows you to view the playlist details, change the name, sort its tracks, remove duplicates or delete the playlist.
Search for a track
The search can be initiated from within the Files app and the Music app itself by using the default search field located in the top bar. To open it, click on the magnifying glass button in the upper right corner.
The search does not provide any automated playback of any kind.
General Search for files
The search feature enables you to find files by their file name or parts of it.
- If you start at the top level "All files", you will also get results of the subfolders displayed. If you change into a sub-directory, the search starts in this folder, shows the results found there first, then continues to search on all other folders and displays the results seperately under search results in other folders.
- A click on one of the results takes you either to the location of the file, if you are not already in that folder, or the item is opened.
-
The search is not case-sensitive, so capital letters are treated the same as lower case characters. You can type Andalucia or andalucia and will get the same results.
-
In the upper right corner of the web interface, click the magnifier icon
 .
. - Start typing, for example an. The suggestion list shows all files with the letter an somewhere inside their names.
Copyright © 2018 VNC - Virtual Network Consult AG, Poststraße 24, 6301 Zug, Switzerland - www.vnc.biz


